Typeform PayPal integration: Setup, limits & best alternative
Summarize with
Collecting payments through an online form is one of the smartest moves a small business or a large organization can make. Instead of chasing invoices or managing separate checkout pages, you can combine data collection and payment into a single, seamless, user-friendly step: your customers fill out the form and pay afterward, all without leaving the page.
When it comes to conversational forms, Typeform is widely regarded as a gold standard. If you are looking for a Typeform payment solution, the platform allows you to create transaction flows. However, before you decide to use Typeform to accept payments for your business, it’s helpful to understand the available payment processors and the specific requirements for Typeform to collect payments successfully.
Here is a breakdown of how the platform handles transactions and how it compares to forms.app for those looking for different levels of flexibility, including on a free plan.
TL;DR
Steps to add PayPal to Typeform:
1. Click + Add content and select Payment
2. Click Connect and enter your PayPal Business email address
3. Authorize access, set your currency and price
Key limits to know:
Requires a paid plan
No recurring payments
Cannot combine PayPal and Stripe on the same form
Why collect payments directly inside a form?
Here are the key reasons to collect payments directly inside your forms, and how it can streamline both the user experience and your workflow:
1. Fewer drop-offs
When customers have to leave a form to complete payment on a separate page, a significant percentage simply won't come back. Embedding credit card payments or PayPal directly inside the form removes that friction entirely.
2. Payment data and form data stay connected
The respondent's answers and their transaction are linked in a single submission record. That makes collecting payments easier to track, reconcile, and follow up on without any manual work.
3. Flexible pricing that adapts to your form logic
Features like Recall information in Typeform let you display the calculated price back to the user before they pay. This makes the whole experience feel transparent and professional, particularly for time payments tied to bookings or registrations.
💡 Expert tip: Where payment forms make a real difference
Event registrations
Freelance or service bookings
Donation forms
Online orders
Workshop sign-ups
How to collect PayPal payments on Typeform?
The Payment field in Typeform makes it easy to collect payments directly inside your form, whether you're billing clients, collecting registration fees, or selling products. Here's how to set it up:
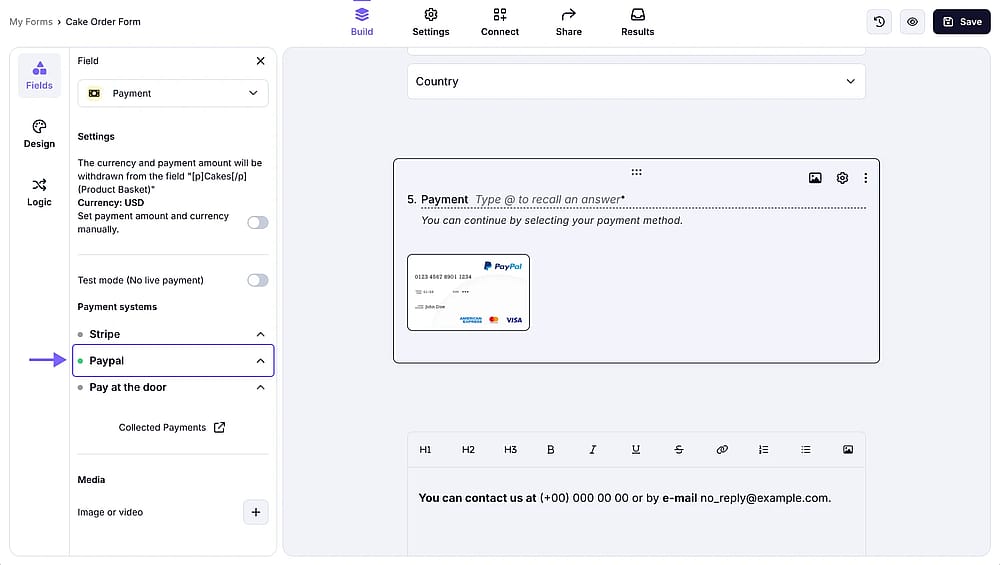
Step 1: Open your Typeform account, go to your form, click + Add content, and select Payment from the menu. Next, click PayPal and set up the connection.
Step 2: A pop-up will appear; enter the email address associated with your PayPal Business account, select your country or region, and click Next. Log in to your existing account or create a new one, then click Continue.
Step 3: Write your payment question text and use Recall information (type @ and select price) to display the price to respondents. In the right-side menu, you can check settings like currency, button text, and more.
Step 4: Press Share or Publish edits to go live. Respondents can then pay via their PayPal account, a debit or credit card.
Try an alternative: forms.app
forms.app is a great Typeform alternative worth considering if you want more flexibility in how you set up your payment integration. Beyond PayPal, you can also connect a Stripe account or offer an offline option, and you can add a payment question to your form on a free plan without upgrading. The PayPal setup in forms.app is straightforward:
1. In your form editor, add a Payment field, then open the field settings and toggle on the PayPal option.
Add the ‘Payment field’ from the field menu and enable the ‘PayPal’ option
💡 Expert tip: Unlike Typeform, forms.app lets you enable up to three payment methods inside a single payment field: PayPal, Stripe, and Pay at the door.
2. Next, hit the Connect to PayPal button that appears in the field settings panel.
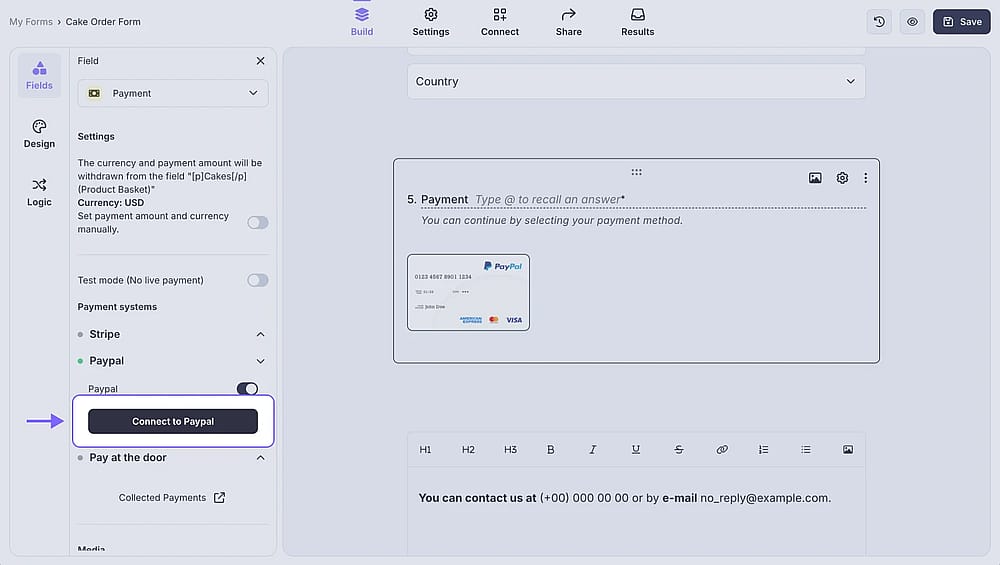
Press the ‘Connect to PayPal’ button
3. A pop-up will appear; simply log in to your PayPal account, and the connection is set up automatically. No manual credentials needed.
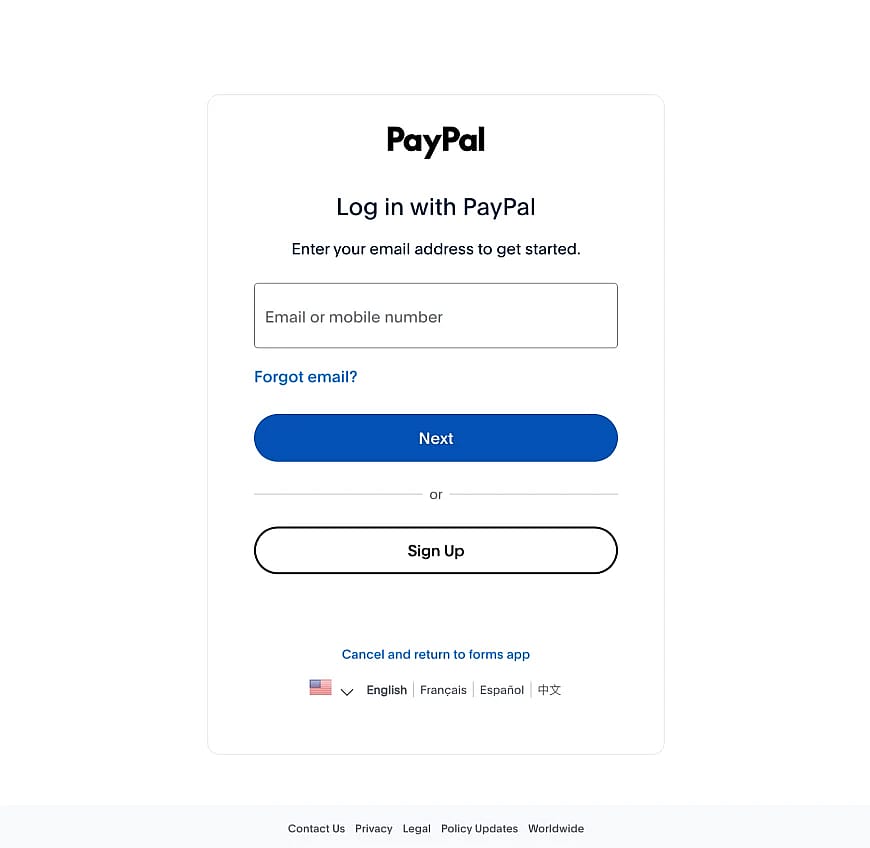
Log in to your PayPal account to finish the setup
💡 Enable Test mode in the Payment field settings to simulate transactions before sharing your form with real respondents.
Conclusion
Built-in payment integrations have made it significantly easier for businesses of all sizes to collect payments without needing a separate checkout system. Whether you're running event registrations, taking service deposits, or collecting donations, having a payment field directly inside your form removes friction for respondents and keeps all your data in one place.
In this article, we walked through how Typeform's PayPal integration works, what you need to get started, and where its limitations are. We also covered how forms.app handles the same use case with added flexibility, including support for multiple payment methods within a single field and access on a free plan. Whichever tool you choose, adding payments to your forms is a straightforward upgrade worth making.
Frequently asked questions (FAQs)
No. The PayPal payment integration in Typeform is only available on paid plans: Plus, Business, or Enterprise.
No. Unlike some other form builders, forms.app doesn’t take any commission or transaction fee from your collected payments.
Please note that payment providers like PayPal may apply their own processing or transaction fees depending on the currency and payment method used.
While Typeform uses Stripe as a primary provider, if you want to offer both options to your respondents, you would need to create two separate forms.
Contributors
Researched & written by
forms.app, your free form builder
- Unlimited responses
- Unlimited questions
- Unlimited team members