Are you using Google Sheets to make your work easier? Many businesses save a lot of time by using Google Sheets effectively. It is a great tool that helps you handle data better and work well with others. Whether you are working with teams from different places, managing big amounts of data, or keeping track of projects, Google Sheets makes things simpler and helps everyone stay on track.
In this guide, we present more than 57+ indispensable Google Sheets formulas, tips, and tricks for Google Sheets that transform your spreadsheet tasks into a breeze. From basic functionalities to Google's advanced features, our comprehensive list will equip you with the knowledge to perform complex analyses with ease.
Why use Google Sheets
Google Sheets's advanced features offer flexible and powerful skills that make data management easier. If we would like to share some essential benefits:
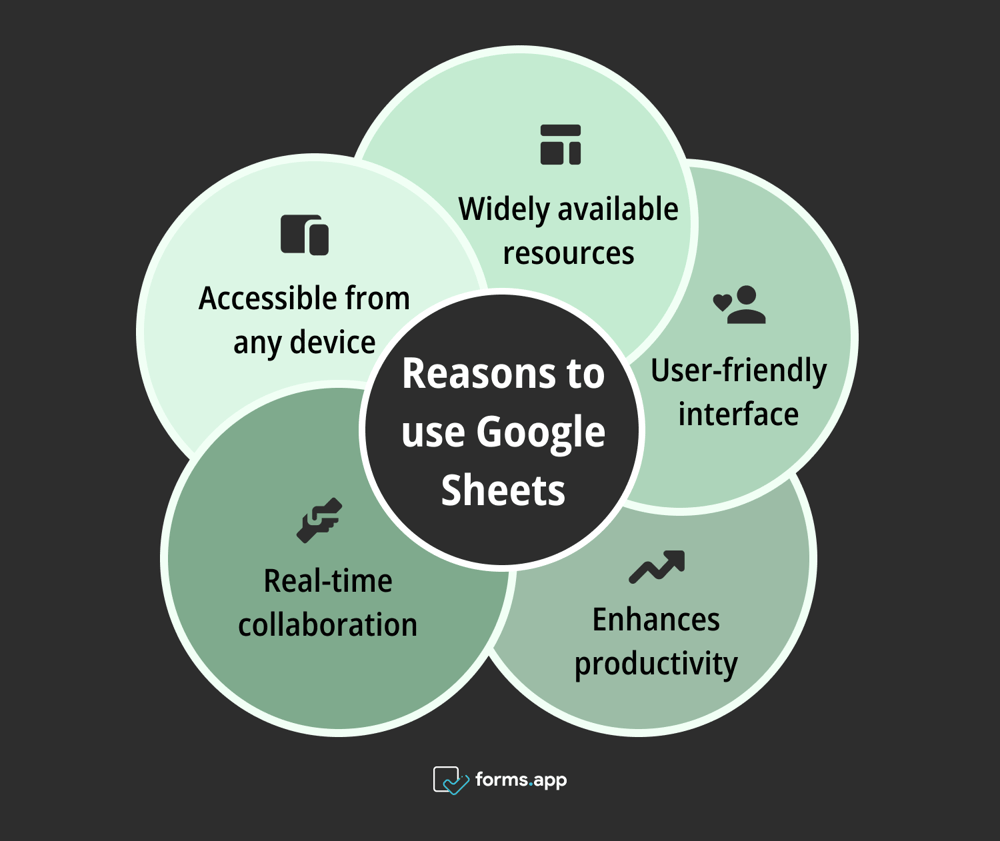
Benefits of using Google Sheets
➡️ Accessible from any device: Work on your data from anywhere, on any device with internet access.
➡️ Real-time collaboration: Share sheets easily with team members and see updates as they happen, ensuring everyone is always on the same page.
➡️ Enhances productivity: Streamlines tasks and improves project management, making it easier to meet deadlines and achieve goals.
➡️ User-friendly interface: Google Sheets has an intuitive interface that is easy to navigate, making it accessible for users of all skill levels.
➡️ Widely available resources: There are many resources available online, from tutorials and templates to forums and communities. They will help you improve your understanding of Google Sheets.
57+ Excellent Google Sheets tips to save time
This guide contains invaluable Google Sheet essentials, ranging from straightforward shortcuts to powerful automation techniques. Whether you are new to Google Sheets or improving your skills, these tips will streamline your tasks and boost your productivity. It will help you to work smarter and achieve goals more quickly.
1. Add Date picker
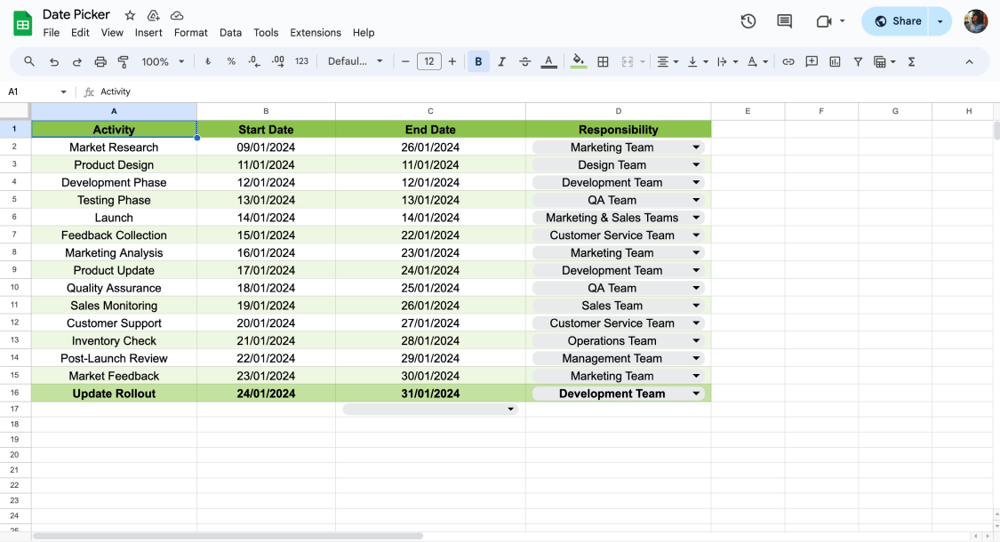
Date picker in Google Sheets
Adding a date picker helps you enter dates quickly. Click on a cell, then set the format to Date using the Format menu. Now, when you click the cell, a calendar pops up to pick a date easily, streamlining data entry in multiple cells.
2. Make Checkboxes
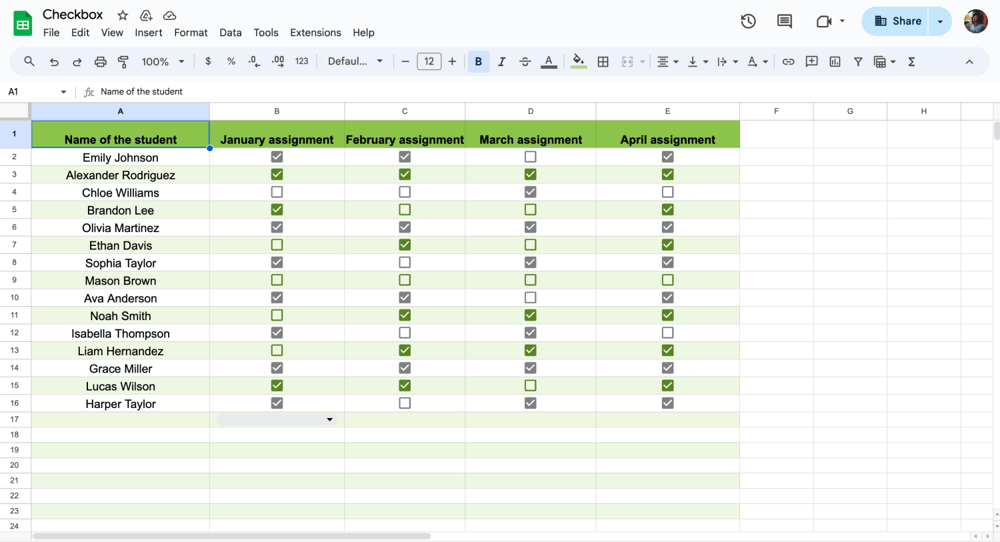
Add checkboxes in Google Sheets
Checkboxes are great for data analysis and project management. Add them by going to Insert > Checkbox in the menu. They are perfect for tracking task completion or yes/no responses across multiple sheets.
3. Make a Dropdown menu
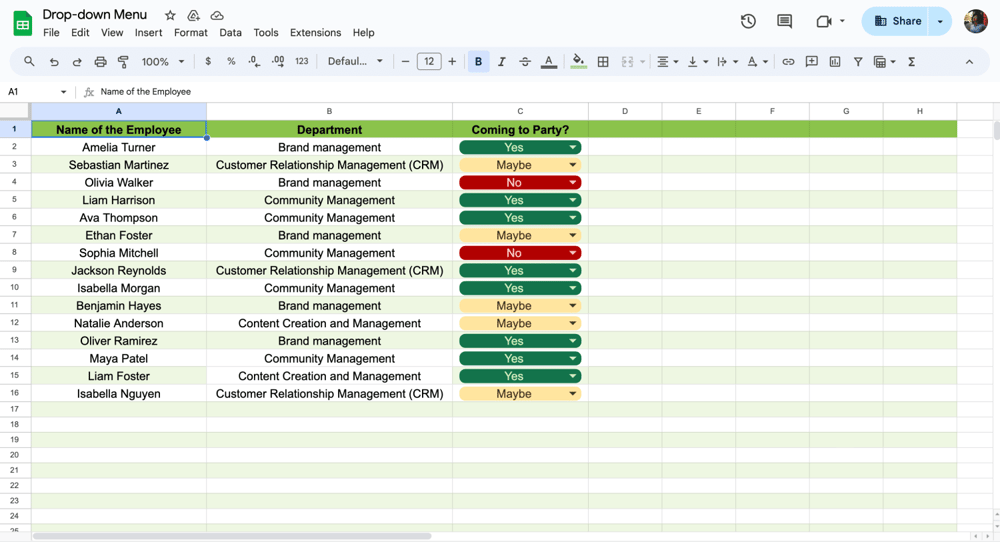
Add a drop-down menu in Google Sheets
Create a dropdown menu to limit data entry to specific options in cells. Ut enhances consistency and reduces errors. Set this up to Data > Data Validation, and select the cells where you want the dropdown.
4. Change the Date format
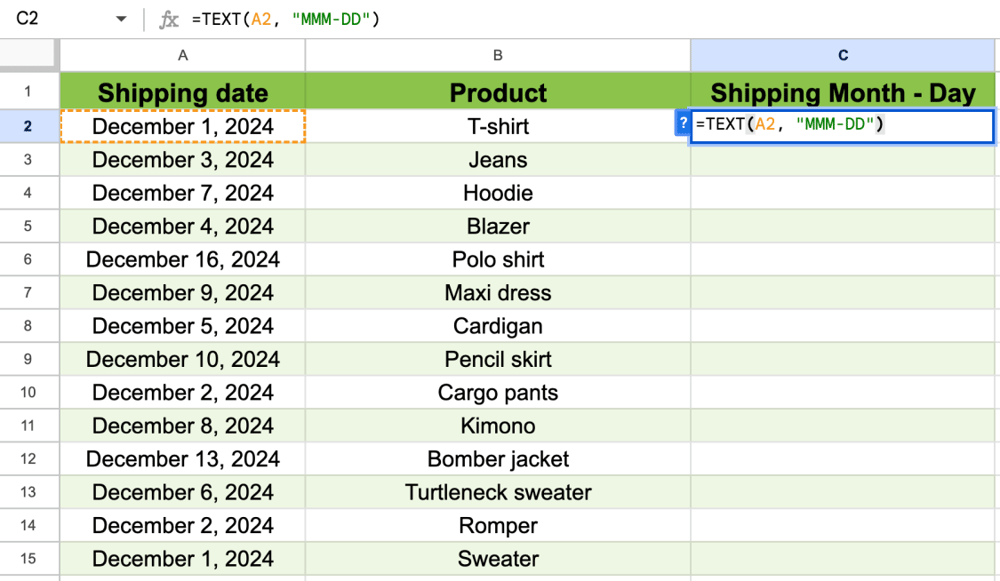
Change the date format
To change the date format in Google Sheets, simply select the date cells, right-click to access Format cells, choose the Number tab, select Date, pick your preferred format, and apply the changes. This allows you to customize how dates are displayed in your spreadsheet for better readability and organization.
5. Data validation
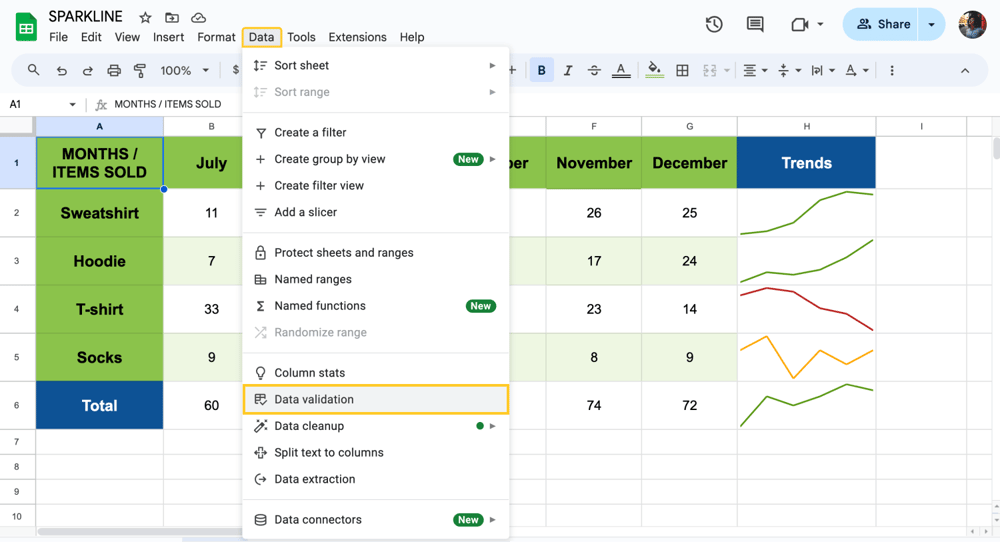
Use data validation
Using data validation rules ensures data integrity. Go to Data > Dalata Validation, where you can set specific criteria that entries in your spreadsheet must meet. This is particularly useful for maintaining consistency in data entry, such as ensuring a column only contains email addresses or dates.
6. Send form data to Google Sheets
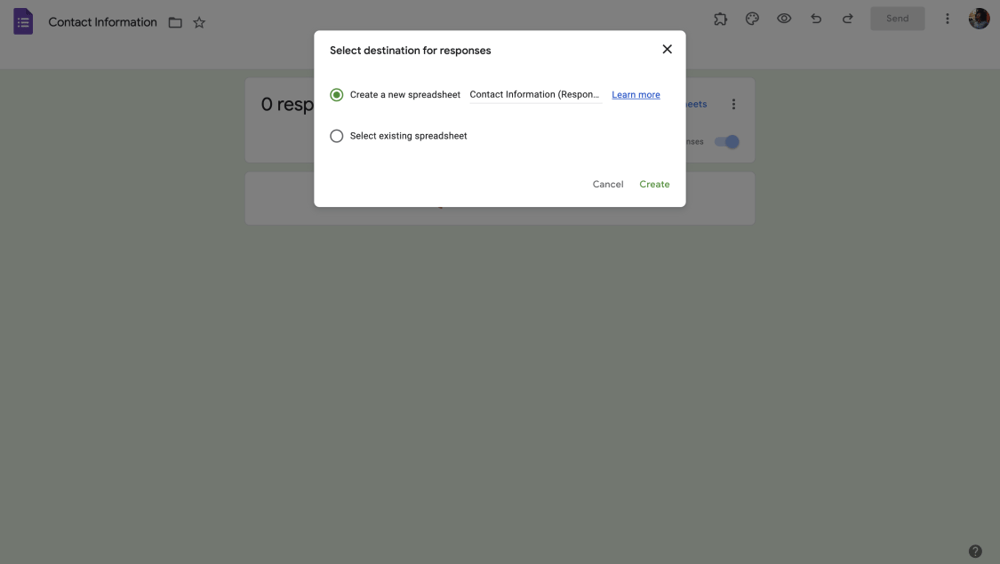
Send form data to Google Sheets
You can automatically pull data from forms into your spreadsheet as long as you follow some basic steps. Set up a form with fields matching your columns in Sheets. Once filled, it sends the email address, responses, and more directly into your sheet, great for gathering important data.
7. Remove duplicates
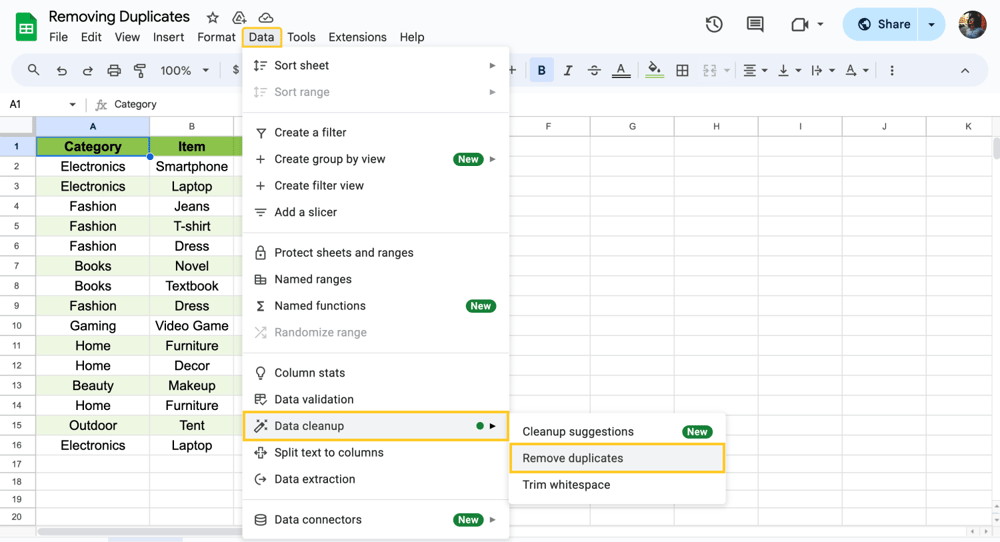
Remove the duplicates in your Sheet
Remove duplicate data in Google Sheets by selecting Data in the menu, then Data Cleanup, followed by Remove Duplicates. Choose the columns to check, confirm header rows, and click Remove Duplicates to clean your dataset efficiently and ensure data accuracy.
8. Split text
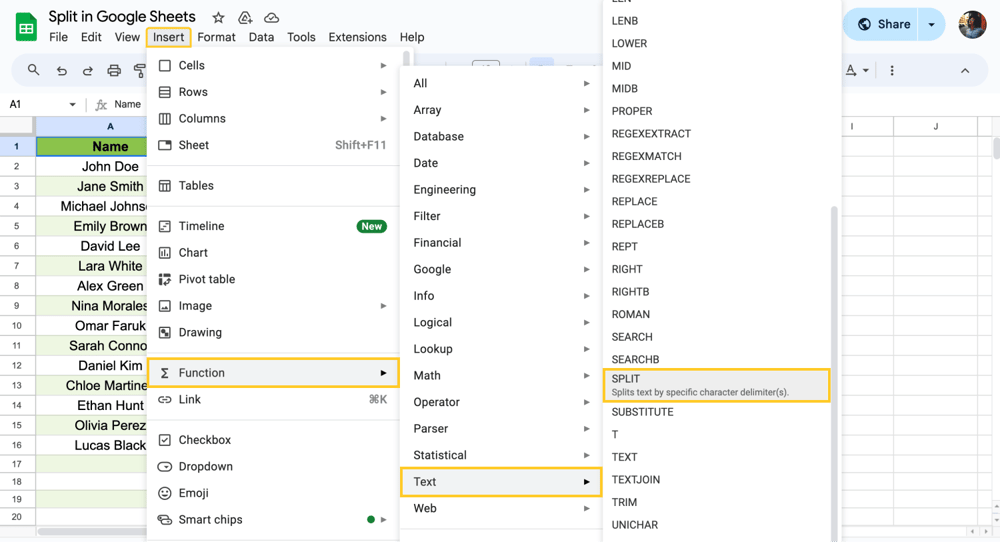
Split your text
Splitting text into different cells helps organize and analyze information better. Use the =SPLIT() function, specify the text and the delimiter, and your data organizes itself into separate columns or rows.
9. Import External data
Bring data from external sources into your Google Sheets with the Import function. Go to Data > Import, and you can bring data from various sources including CSV files, web pages, or even from other Google Sheets. This allows for easy data analysis and aggregation without manual entry.
10. Undo / Redo in Google Sheets
Quickly correct mistakes or revert changes in Google Sheets using the Undo and Redo functions. These are essential for editing spreadsheets efficiently. Use Ctrl + Z (Windows) or Cmd + Z (Mac) to undo, and Ctrl + Y (Windows) or Cmd + Shift + Z (Mac) to redo actions.
11. Paste Special options
With Paste Special options, you can control how content is pasted into your sheets. This feature is useful for pasting values only, formatting, or formulas, ensuring that data is integrated exactly how you need it. Shortcuts are Cmd + Shift + V or Ctrl + Shift + V
12. Lock Cells to prevent editing
You can secure important data, protecting specific cells from accidental edits or changes. Go to Data > Protected sheets and ranges to set permissions for these cells. This way, only authorized users can make modifications, ensuring the integrity of critical data.
13. Use Find & Replace
Quickly modify text or numbers with Find & Replace by accessing it through the Edit menu. This tool allows for precise replacements across your spreadsheet, helping to maintain data accuracy and consistency. (Ctrl + H or Cmd + Shift + H)
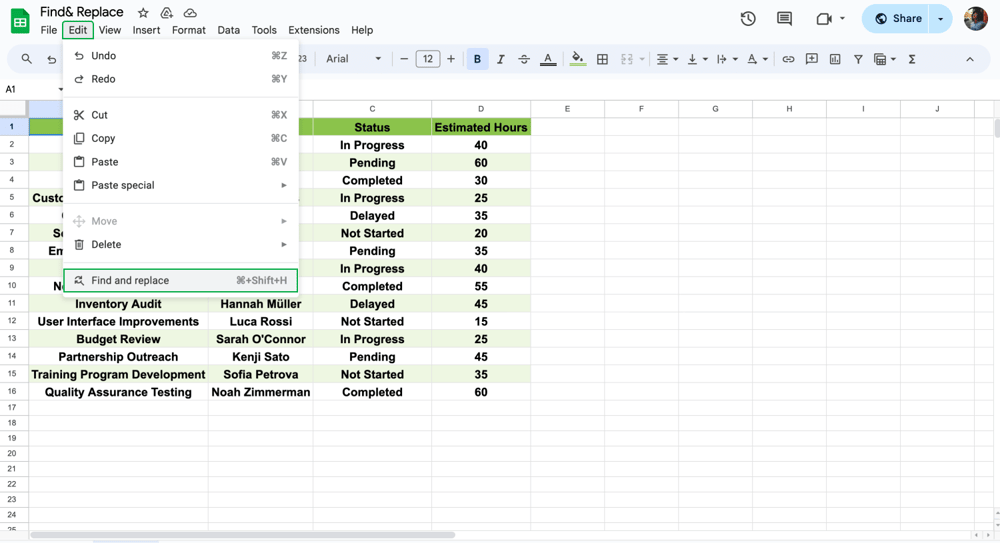
Find & Replace in Google Sheets
14. Count Characters
Counting characters helps you determine how many letters, spaces, and symbols are in a cell or group of cells. This information is useful for organizing data better and making content creation easier. For example, to count characters in a single cell, you can use the formula =LEN(cell_reference).
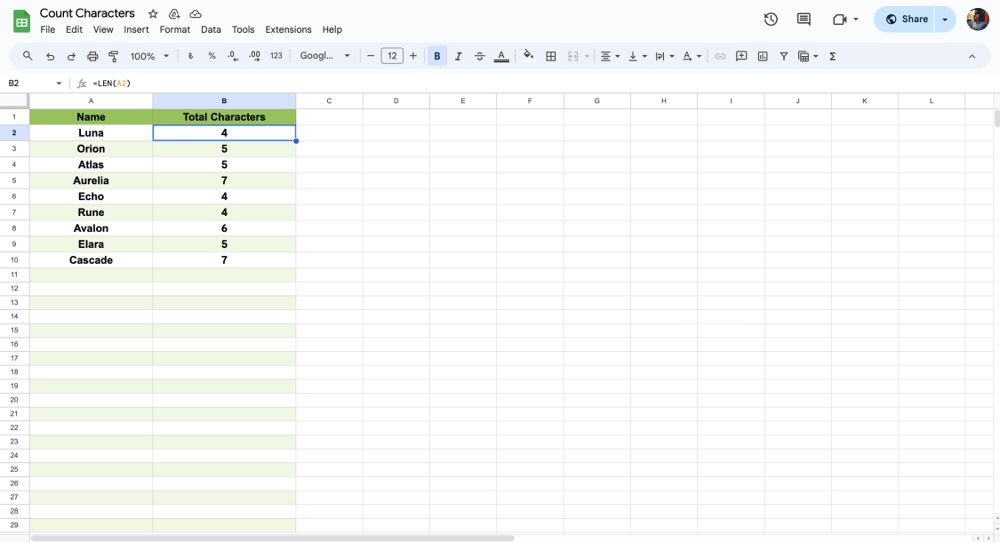
Character count in Google Sheets
15. The Filter function
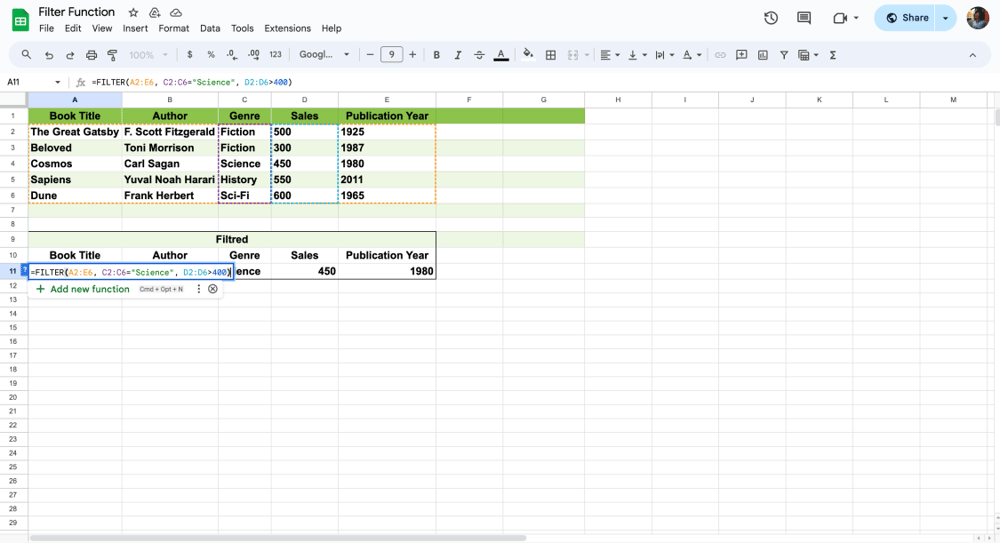
Filter function
The Filter function lets you display only the rows in your sheet that meet certain criteria. It is an efficient way to sift through and analyze important data without altering the whole dataset. To use it, just use =FILTER() and define your conditions.
16. XLOOKUP function
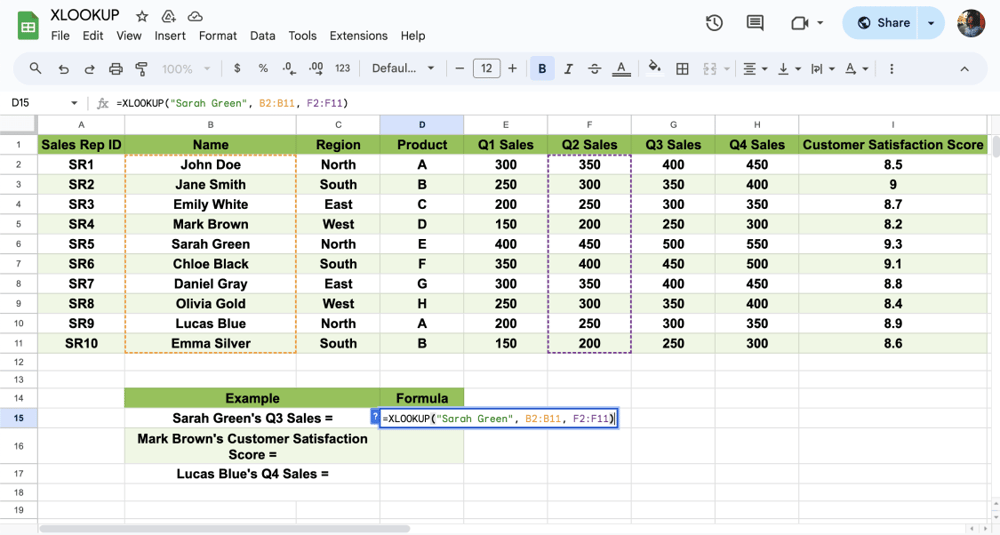
XLOOKUP function
Use the XLOOKUP function to find things in a table or range of cells by row. For example, to pull up important data in a list, just type the function, specify what you seek, and where to find it. It’s a powerful tool to select the cells you need without sorting.
17. Unique function
The Unique function simplifies finding distinct entries in a column or row. Just type =UNIQUE() and select your range of cells. It automatically removes duplicates and helps in organizing rows and columns efficiently.
18. SORT function
Organize your data efficiently by using the SORT function. This function allows you to sort data alphabetically or numerically without manually rearranging columns. Use =SORT(range, sort_column, is_ascending) to automatically sort your data based on the column you specify.
19. Use the GOOGLETRANSLATE function
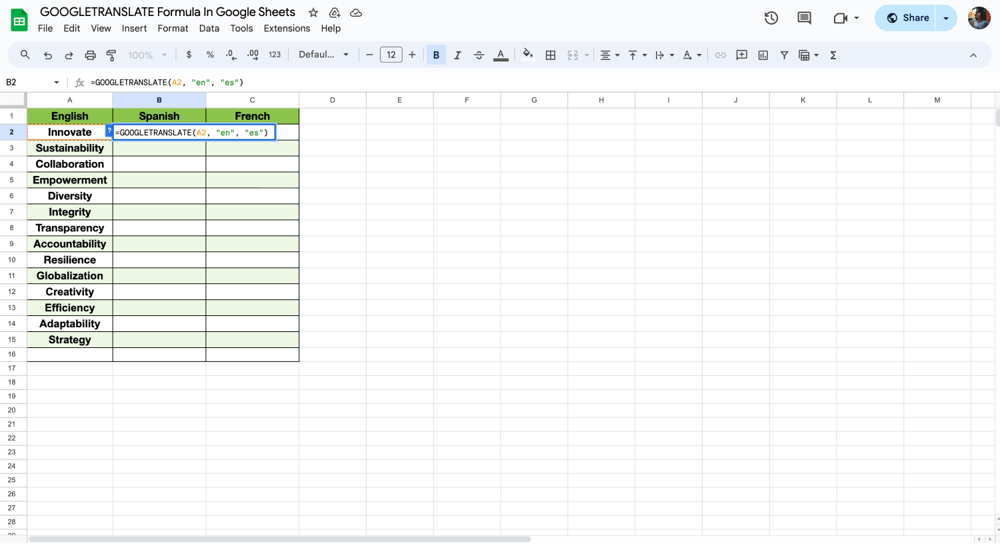
GOOGLETRANSLATE function
Expand your global reach by using the GOOGLETRANSLATE function in Google Sheets. This function automatically translates text in your spreadsheet from one language to another. To use this feature, simply enter =GOOGLETRANSLATE('text,' 'source language,' 'target language,').
20. Data Consolidation with IMPORTRANGE
Using the IMPORTRANGE function, you can combine data from multiple Google Sheets into one sheet. This is ideal for consolidating data from different projects or departments. To pull data from another sheet, use =IMPORTRANGE('spreadsheet_url', 'range_string').
21. ISBLANK function to identify empty cells
The ISBLANK function quickly identifies and shows empty cells in your data. This function returns true if a cell is empty, which is useful for conditional calculations and formatting. For example, =IF(ISBLANK (A1),' Empty', 'Not Empty') checks if A1 is empty.
22. Create Custom Functions with Google Apps Script
Connect apps that stream real-time data to bring live data into Google Sheets. This is great for monitoring and analyzing live information from IoT devices, financial systems, or social media metrics.
23. Using basic functions
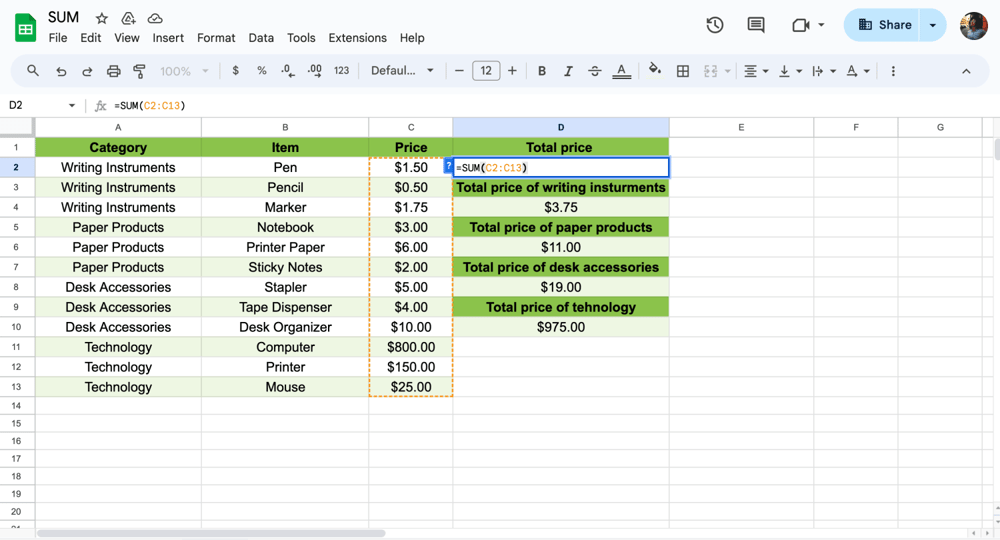
Usage of the SUM function
Master the basic Google Sheets functions like SUM, AVERAGE, and COUNT to manage data effectively. These functions are fundamental for performing mathematical operations similar to those in Microsoft Excel. For instance, you can sum a column of numbers by typing =SUM(A1:A10) into a cell.
24. Utilize the EQUALS SIGN in formulas
The equals sign (=) is crucial in Google Sheets as it signifies the start of any formula. It tells Google Sheets that the following text is a formula. For example, =A1+A2 will add the values of A1 and A2.
25. Show formulas
Showing formulas in your cells instead of the computed results can help with troubleshooting and auditing your work. To display formulas, press `Ctrl + `` (grave accent) or go to View and select Show > Formulas This makes it easier to review and edit the formulas in your spreadsheet.
26. Removing gridlines
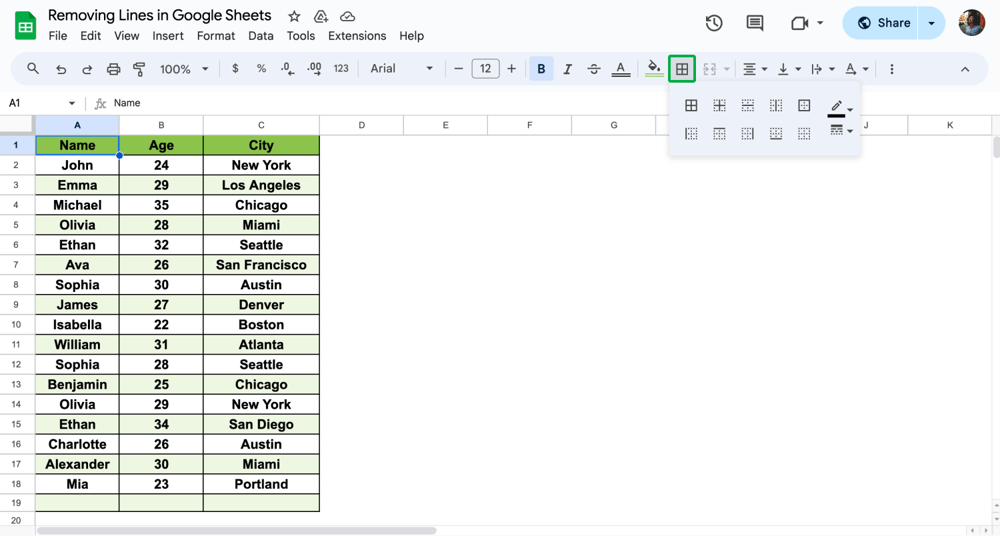
Remove gridlines
Remove gridlines to clean up your view. Google Sheets's gridlines feature lets you focus on the content. To do so, go to View in the menu and uncheck Gridlines. This will make your document cleaner and perfect for presentations.
27. Wrap text
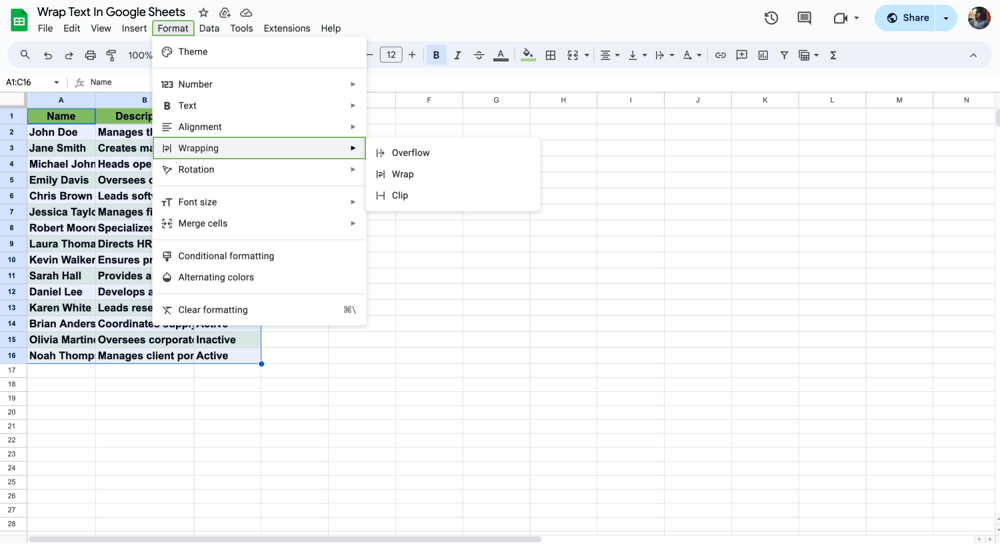
Wrap your text
Wrapping text is useful when you want to see all the content in a cell without it spilling over. It ensures text fits within the cell, enhancing readability. To activate it, select the range of cells and click Wrap Text in the toolbar.
28. Merge cells
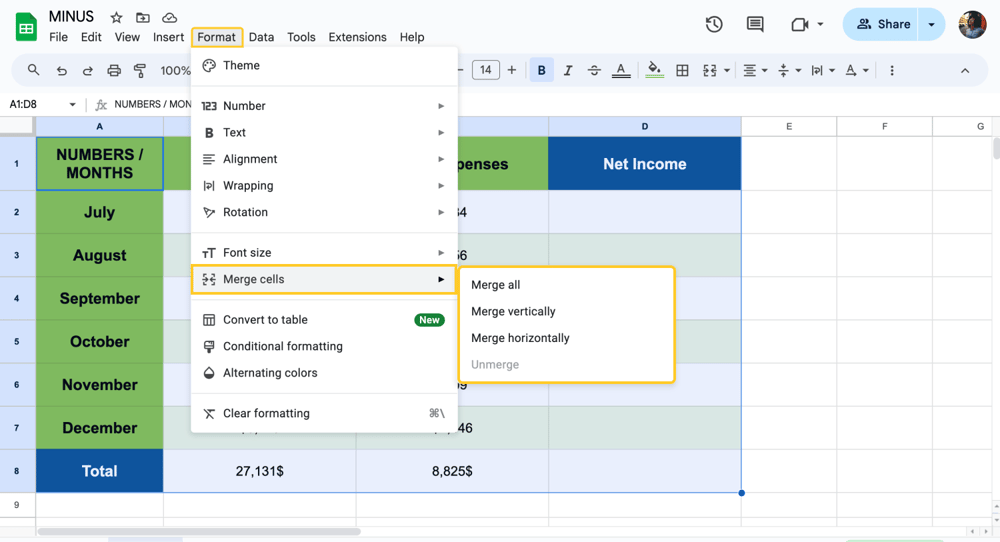
Merge cells
Combine multiple cells into one larger cell, which is especially useful for headers or categorizing groups of data. Select the cells you want to merge, right-click, and choose Merge cells, or use the Format menu to select your merge options, ensuring a cleaner, more organized layout.
29. Protect individual cells
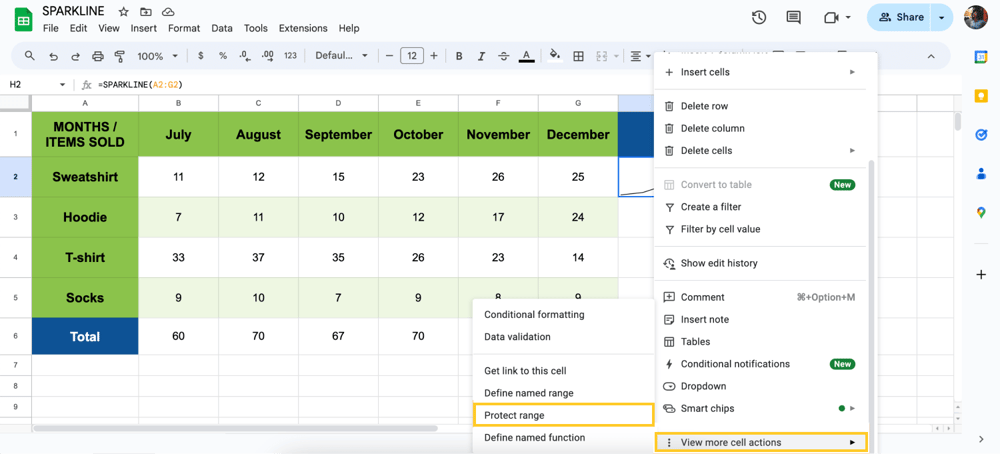
Protect ranges for control
You can also protect individual cells instead of entire sheets or ranges. This is particularly useful in collaborative environments where you want to prevent specific critical data from being altered. Right-click the cell, choose Protect range, and specify the permissions.
30. Rotate Text
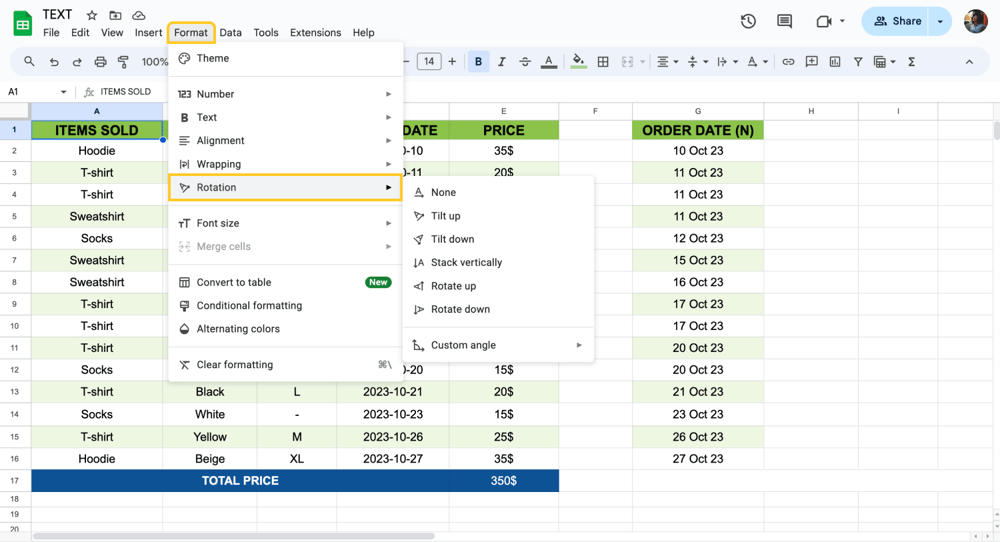
Rotate your text in different options
Rotating text can help you save space and make headers more visible. To rotate text, select the cells you want to modify, then go to Format, choose Text rotation, and select your preferred rotation style. This simple adjustment can greatly improve the readability and layout of your spreadsheet.
31. Set the Font Size of Text
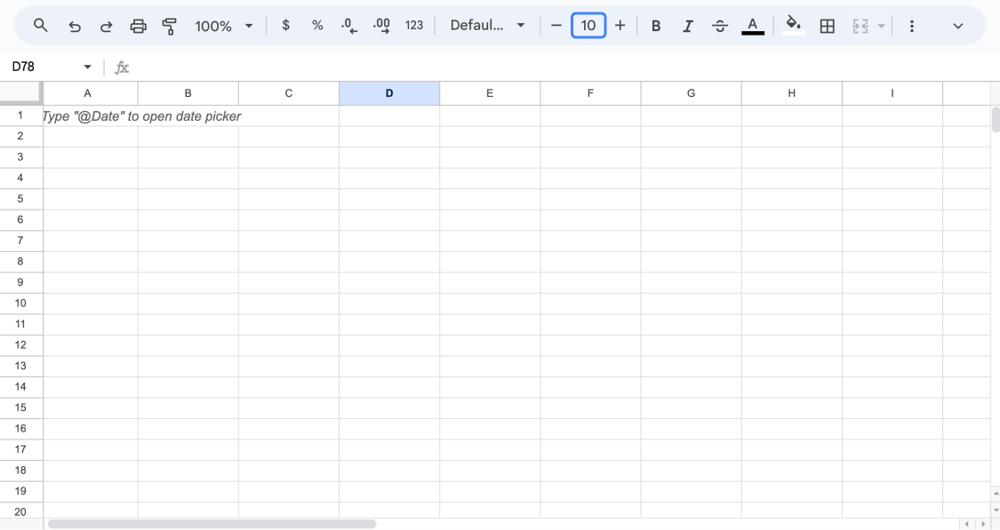
Customize the font size
Changing the font size can make your spreadsheet easier to read. Click on the cell or select the range where you want to change the font size. Then, click on Format, go to Text, and choose Font size. Select the size you need to make your text clear and visible.
32. Insert Row / Column
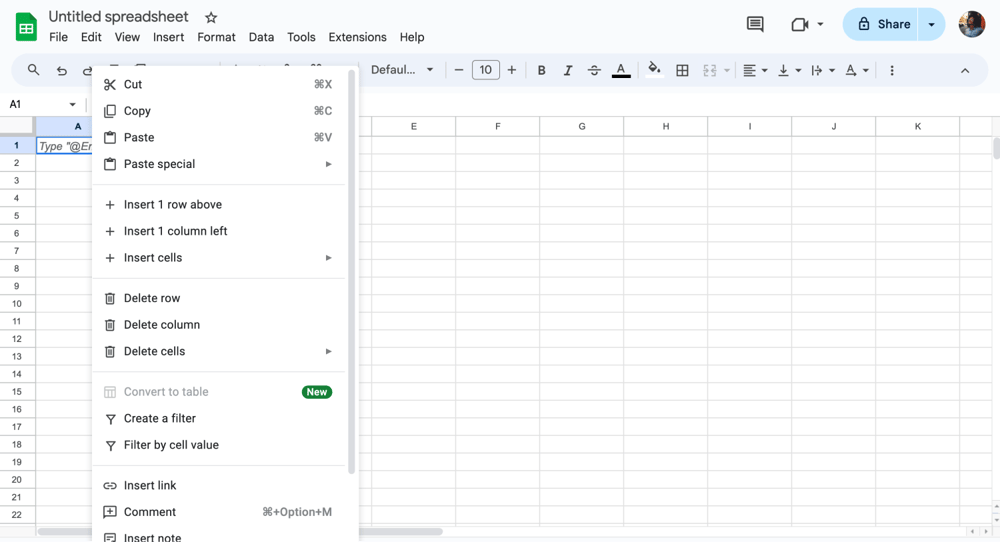
Add row & columns
Easily add rows or columns in Google Sheets to accommodate additional data. This feature is accessed by right-clicking the row or column header where you want the new row or column and selecting the appropriate option. It helps expand your dataset seamlessly without disrupting existing data alignment.
33. Freeze Rows or Columns
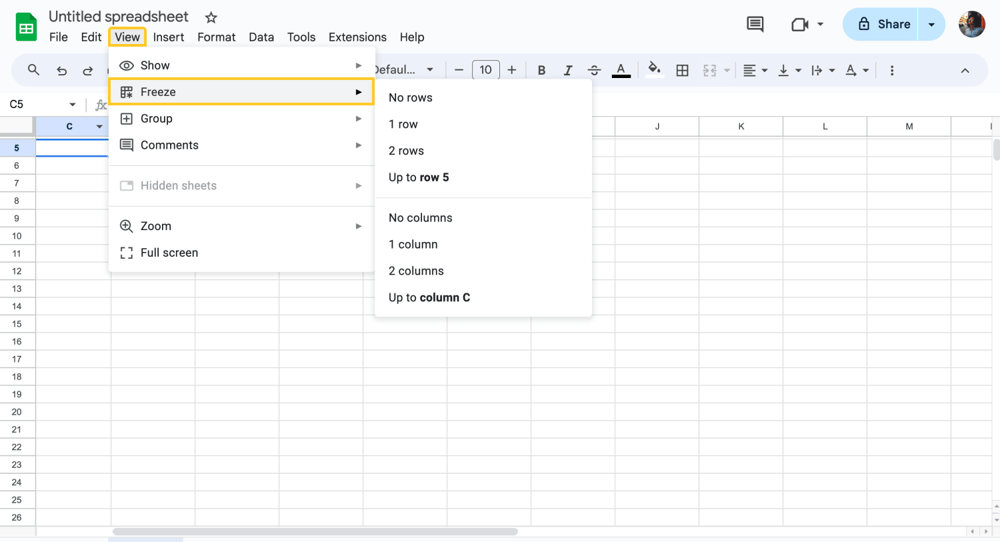
Freeze row or columns
Freezing rows or columns in Google Sheets keeps selected areas visible as you scroll through the sheet. This function is particularly useful for maintaining the visibility of headers or important data points as you navigate large datasets. Access this feature through the View menu by selecting Freeze.
34. Quickly Resize Rows and Columns
You can quickly adjust the size of rows and columns by selecting the row or column headers and double-clicking the boundary line. This auto-resize feature adjusts the row or column to fit the longest piece of data in the section.
36. Groups Columns or Rows for better organization
Group columns or rows to better manage your sheet’s display. Select the rows or columns, right-click, and choose Group. This allows you to collapse or expand groups of data as needed.
37. Slicer Feature
Slicers make it easy to filter data in a visually interactive way. Add a slicer by clicking on Data and then Slicer. Once added, you can set it to filter the data in your table or chart based on the criteria you choose. Slicers provide a quick way to adjust what data is displayed without altering your dataset.
38. Customize Sheets with Themes
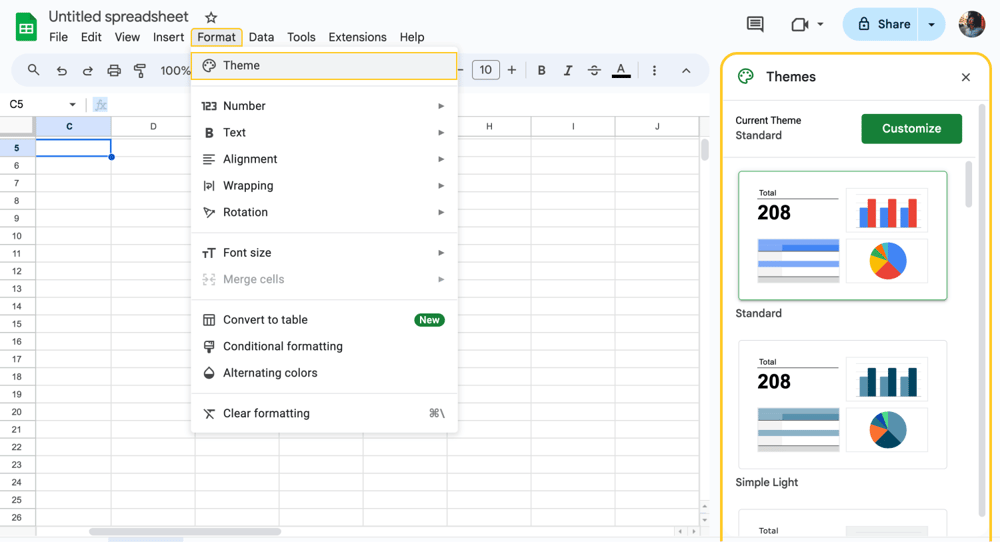
Customize the theme
Apply themes to personalize the look of your Google Sheets. Go to Format > Theme to select from various colors and font styles. This can help match your spreadsheet’s appearance to your company branding or personal preference.
39. Conditional Formatting
Conditional Formatting automatically applies specified formatting styles to cells that meet certain criteria. This tool enhances data visualization by highlighting key information, such as outliers, trends, and exceptions, making complex data sets easier to analyze. Set up rules via the Format menu.
40. Create Visually Appealing tables
To make your data stand out, you can create visually appealing tables in Google Sheets. Select your data range and click on Format, then Table Styles. Choose from various styles to enhance your table’s appearance, making it both attractive and easy to read. This feature helps present your data in a more organized and visually appealing way.
41. Clear Formatting
You can reset the formatting of a cell or range of cells by selecting them and then going to Format > Clear Formatting. This removes any set formatting styles and is handy for cleaning up your spreadsheet's layout.
42. Pivot Table reports
Pivot Table Reports organize and summarize complex data sets in Google Sheets. They enable users to extract significant insights by dynamically arranging and calculating data based on selected criteria. To create a pivot table, go to Data, select Pivot Table, and configure your desired fields and calculations.
43. Add a Pie Chart
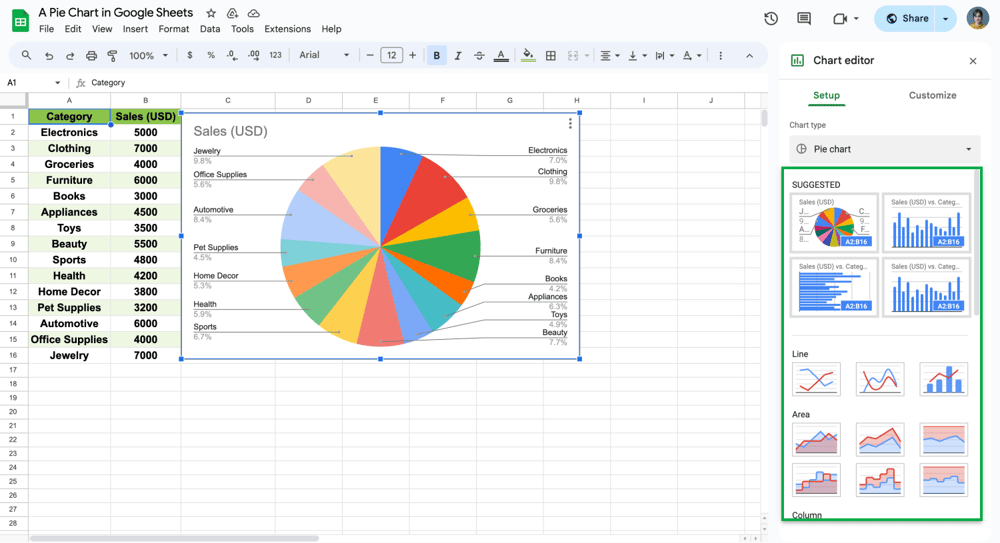
Add a pie chart & Customize settings
To visualize data proportionally, add a pie chart by selecting your data, clicking Insert, then Chart, and choosing Pie chart from the chart types. Customize it by adjusting colors and labels to fit your presentation needs.
44. Make an x-y graph
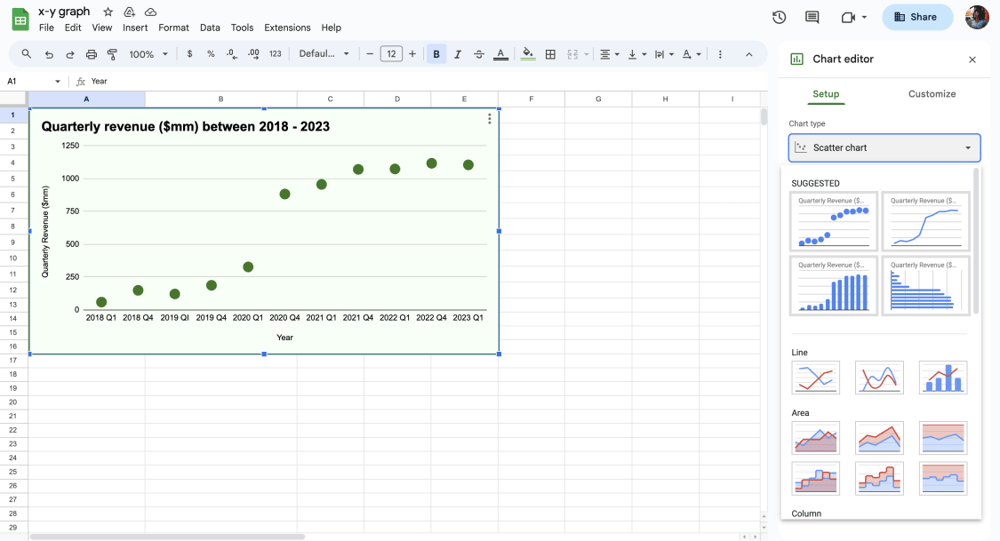
Add an x-y graph
An x-y graph in Google Sheets visually shows relationships between two sets of data points, helping analyze correlations and trends. To create one, select your x and y data, click Insert > Chart, choose Scatter chart, customize as needed, and share for collaboration.
45. Make Line graphs
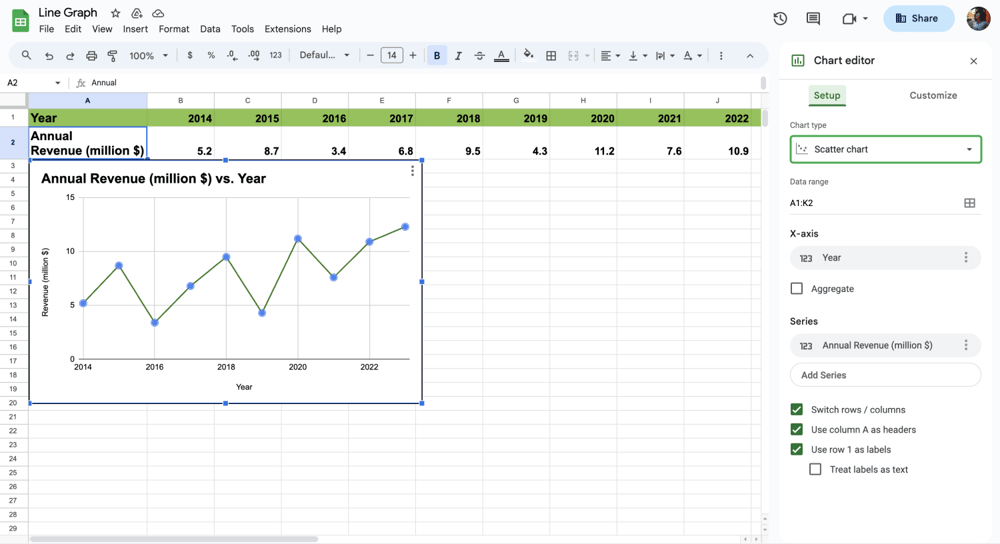
Add a line graph
Google Sheets' line graphs are invaluable tools for summarizing data trends and patterns over time or variables. They offer a clear visual representation of changes, making it easier to understand data relationships. To use them, simply select your data range, click Insert > Chart, customize the graph's style and appearance, and share your document for effective collaboration and data presentation.
46. Explorer Feature
To link to external websites directly from your cells, select the cell where you want the link, then go to Insert and choose Link, or simply press Ctrl + K (Cmd + K on Mac). You can then enter the URL and a display text, making it easy to access web resources directly from your spreadsheet.
47. Use Google Sheets offline
Google Sheets has offline capabilities that let you work without an internet connection. First, make sure to enable offline mode in Google Drive Settings. Then, you can view, edit, and save your spreadsheets anywhere, anytime, and changes will sync once you reconnect to the internet.
48. Automate Tasks with Macros
Record and automate repetitive tasks using Macros. Go to Extensions > Macros > Record Macro perform the tasks you want to automate, then save the macro. You can use these macros later to repeat the actions exactly, saving time and effort.
49. Use Apps Script to extend functionality
Google Sheets supports custom scripting through Google Apps Script. Access it via Extensions> App Script to write custom scripts that can automate workflows, integrate with other services, or even develop custom functions.
50. Link Google Sheets with Other Google Apps
Take advantage of Google Sheets’ ability to integrate seamlessly with other Google services. For example, you can link data between Google Sheets and Google Slides to dynamically update figures in a presentation whenever the data changes in your sheets.
51. Manage Sheet versions and history
Keep track of changes and revert to previous versions of your spreadsheet. Go to File > Version history > See version history to view earlier versions, compare changes, and restore a previous version if needed.
52. Add Notes to cells
Add notes to specific cells for additional context or reminders. Right-click on a cell and select Insert note to add your comment. This is particularly useful for providing insights or instructions without changing the data.
53. Duplicate Sheets for backup
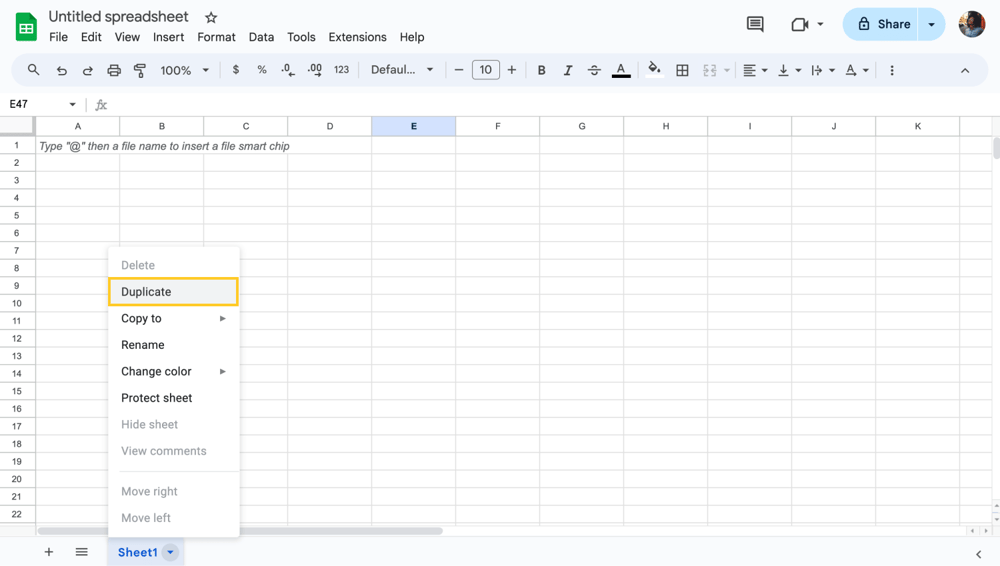
Copy your Sheets page
Create backups of your important sheets by duplicating them. Right-click on the sheet tab and select Duplicate. This will create a copy of the sheet within the same workplace which is useful for testing changes without affecting the original data.
54. Generate QR Codes
Create QR codes within Google Sheets to provide quick access to websites, product information, or other data. Use a formula or an add-on to convert URLs or text in your sheet into scannable QR codes.
55. Automate Data backups
Set up automatic backups of your Google Sheets to ensure your data is never lost. Use Google Apps Script to copy your data periodically to another location, like Google Drive. It helps you to have regular snapshots of your data for security.
56. Add and Manage Comments for collaboration
You can give teamwork by leaving comments in cells. Just right-click on a cell, choose Comment, and jot down notes or feedback. Everyone with access to the sheet can see these comments, making it perfect for collaborative projects that rely on clear communication within the document.
💡Check out our article on Google Sheets permissions to learn more!
57. Share Documents as PDFs
It is also possible to convert your Google Sheets to PDF format for easy sharing or printing. Go to File > Download and select PDF document (.pdf). This allows you to distribute your documents in a universally accessible format.
Key points to take away
In this guide, you have learned everything from quick data entry methods like using data entry methods to advanced manipulations with functions. These tools are invaluable for anyone looking to enhance their spreadsheet skills and streamline their workflows.
For more insights and a deeper mastery of Google Sheets, continue exploring our resources and blogs. You will find more details about various functions and tools in Google Sheets with much more details with clear steps. Stay tuned!
forms.app, your free form builder
- Unlimited views
- Unlimited questions
- Unlimited notifications
