How to grade your quizzes on Google Forms
Summarize with
TL;DR: Steps to Grade Google Forms
1. Open your form in Google Forms and go to Settings → Make this a quiz
2. Choose when to release grades: immediately after submission or later after manual review
3. Add your questions, then click Answer key on each question to mark correct answers and assign point values
4. Optionally add feedback messages for correct and incorrect answers
5. Click Send to share your quiz with respondents
6. Go to the Responses tab to see the Summary, Question, and Individual views
7. For open-ended questions, go to Responses → Individual, assign points manually, and click
Add individual feedback
8. Release grades by clicking Release score in the Individual tab and selecting Send emails and release
Grading quizzes and exams in Google Forms takes just a few minutes.
As grading quizzes manually is one of the most time-consuming parts of teaching or running assessments, using Google Forms’ built-in quiz mode can handle a significant chunk of that work automatically.
But the process isn't entirely obvious. There are question types that can't be auto-graded, settings that need to be configured in the right order, and options for releasing grades that most people miss entirely.
In this article, you will learn how to use Google Forms to grade quizzes, a better version of creating and grading quizzes and online exams with the help of the advanced features of forms.app, and frequently asked questions about how to grade responses in Google Forms.
What you need before grading Google Forms
Before jumping into the steps, make sure you have the following in place:
- A Google account (obviously)
- A form you've already created, or you're starting a new one from scratch
- Email collection enabled if you plan to release grades manually. This will require students to be logged into Google when they fill out the quiz
- A basic sense of which question types you'll use. Not all of them support automatic grading (more on this in the next section)
Which question types can be auto-graded in Google Forms?
This is one of the most important things to understand before building your quiz. The following question types support automatic grading:
- Multiple choice
- Checkboxes
- Dropdown
- Short answer (exact match only)
- Multiple choice grid
- Checkbox grid
Important note
On short-answer questions, auto-grading works only when the student's text exactly matches what you've entered in the answer key. If students might write "USA," "U.S.A.," or "United States" interchangeably, you'll want to add all accepted variants in the answer key, or switch to multiple choice instead.
The Paragraph, File upload, Linear scale, Date, and Time fields are not suited for auto-grading in Google Forms. But Google Forms allow you to add manual grading after you collect a response; so you can manually grade answers later on.
How to grade Google Forms (Step-by-step)
Google Forms is a good tool for creating and grading online quizzes or exams. While it may get a little restrictive from time to time, it is more than enough for most exams and quizzes online. Here are all the steps to automatically grade a Google Form:
1. Create your form and make it a quiz
The first step of grading is to create quizzes in Google Forms. To create a quiz in Google Forms, simply start as you would normally create a Google Form and click on the Settings tab. Within the Settings tab, toggle the setting that says Make this a quiz. This will give you additional settings about your Google Forms quiz.
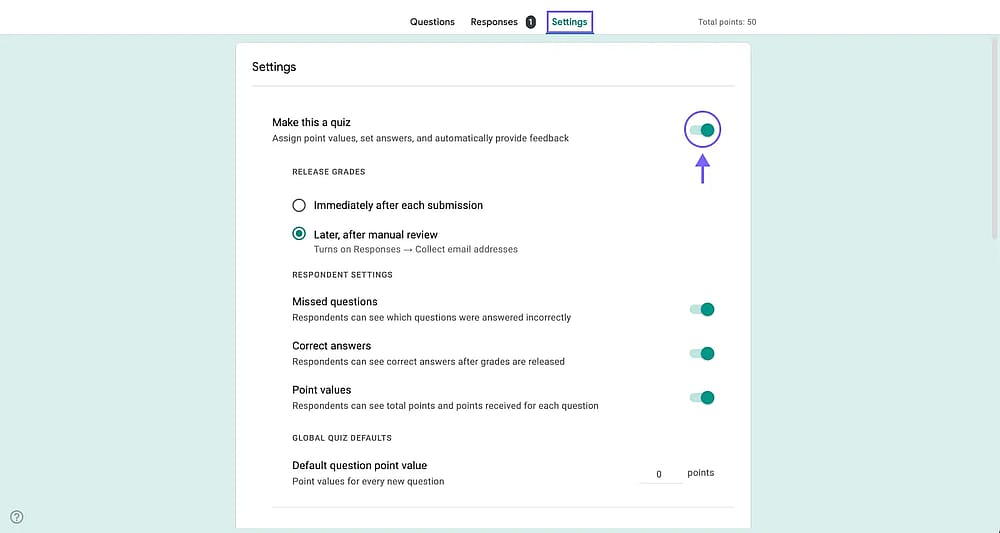
The “Make this a quiz” setting in Google Forms
2. Choose when to release grades
Under Make this a quiz setting, you will see two options for how to release your grades. You can let the students see their grades immediately after each submission or Later after manual review.
- Choose immediately after each submission: If all your questions can be auto-graded.
- Choose Later, after manual review: If you manually need to review and grade some answers for each submission.
Note
The manual review setting automatically turns on the Collect email addresses setting so that you can notify students after your review.
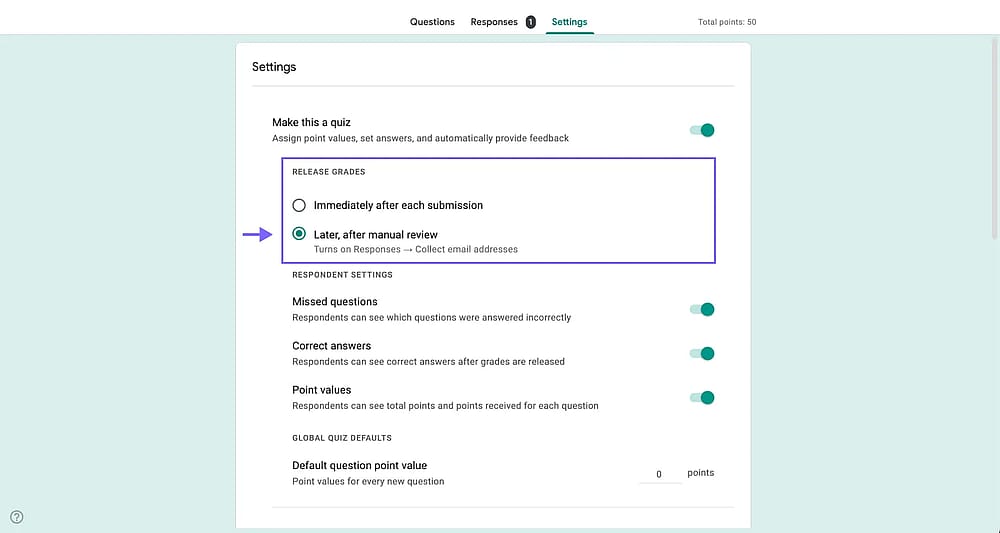
Releasing options for Google Forms quiz score
3. Add your questions and create an answer key
After you review and adjust the necessary settings, simply add your Google quiz questions and answer options and customize your Google Form to finish the content of your quiz. Try to add different question types, such as short-answer or multiple-choice questions. After completing your questions and visuals, you must create an answer key so your quiz can be properly graded.
To create an answer key, simply click on the questions themselves and click on the Answer key setting at the lower left side of the question
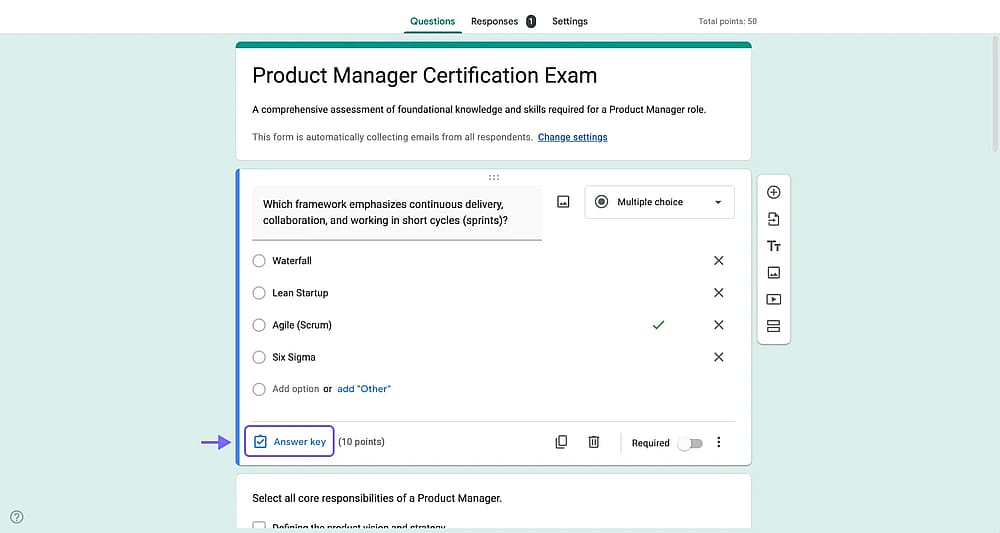
Answer key button on a Google Forms question
You can then choose which answer or answers are correct and assign point values for them with the answer key setting.
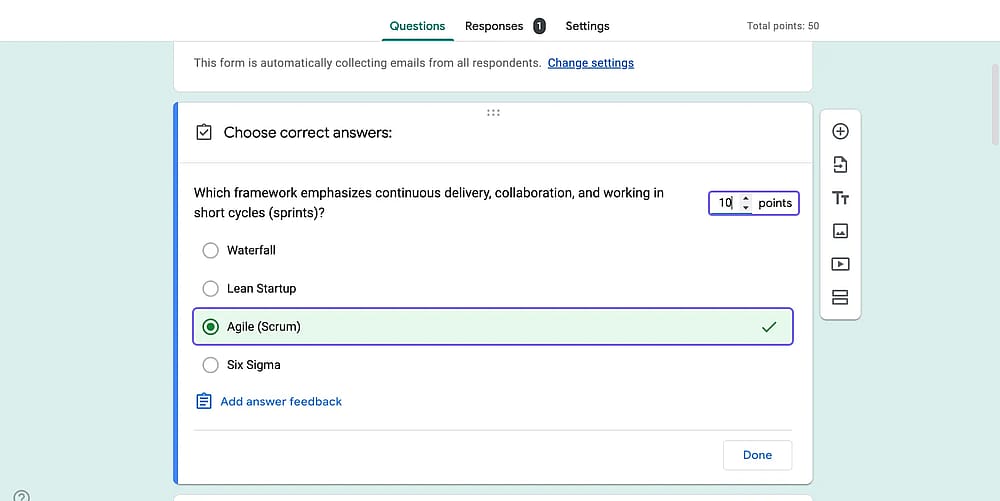
Adding correct answers to the answer key for a Google Forms question
4. Add feedback messages for correct and incorrect answers (Optional)
Optionally, click Add answer feedback to write a message (or link a YouTube video) that respondents will see depending on whether they answered correctly or incorrectly
Note
Answer feedback is an underused feature. Linking to the relevant part of your lesson or adding a brief explanation of why an answer is wrong can significantly improve how much students learn from a quiz.
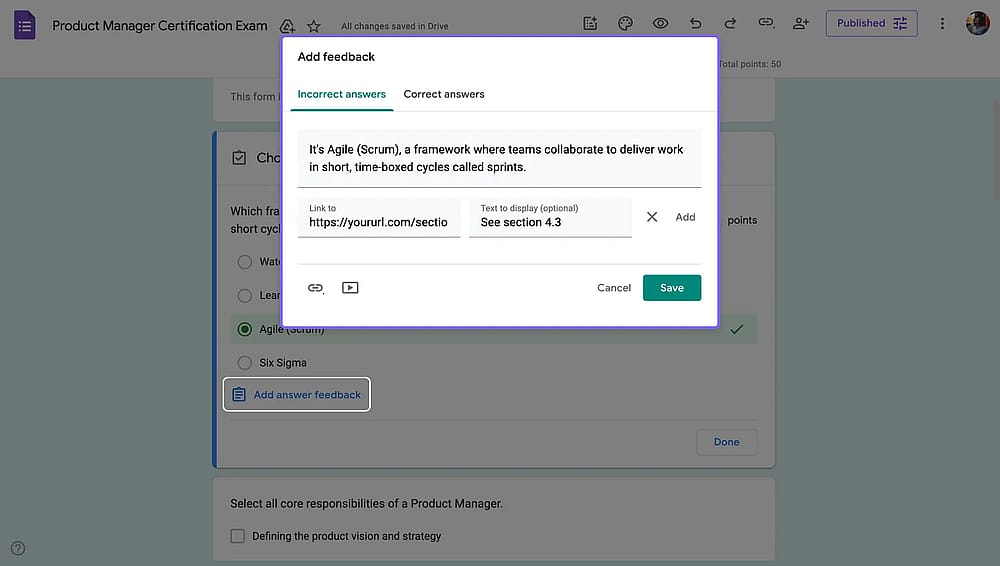
Adding answer feedback to a Google Forms question
5. Share your quiz and collect responses
After you assign all the points, complete the answer key, and add feedback to the questions that you want, it is time to share your quiz with your students. Simply hit the “Publish” button in the upper right-hand corner and adjust sharing settings, like closing the Google Form at a certain time.

Sharing a Google Form
6. Go to “responses” to review answers
Once you share your quiz and start collecting responses, you can head to the Responses tab.
The Summary tab shows the total number of responses, the average score, and more. Furthermore, the Questions tab shows how your students are doing on each individual question, which is a great tool for identifying which questions they are struggling with. Lastly, the Individual tab shows the responses of each individual student.
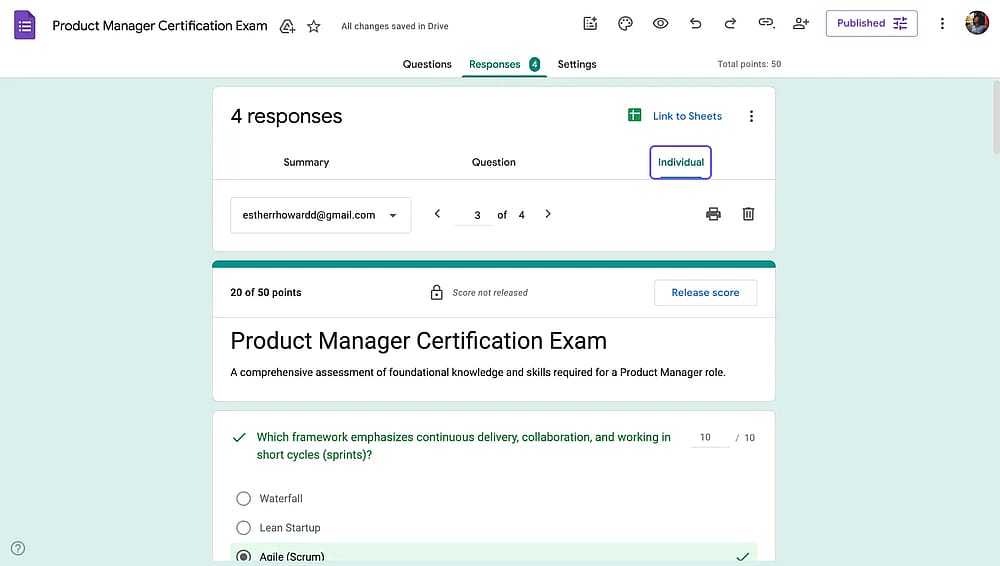
The responses tab in a Google Form
7. Grade open-ended questions manually
Once you collect all the responses, it is time to grade them and give the necessary feedback to your students. If you have toggled the Immediately after each submission setting, you will not need this step. However, if you have toggled the Later after manual review setting, this step is for you.
You can grade the responses by either going to the Questions tab or the Individual tab. Each tab allows you to give points for correct answers and add feedback for your students. Simply scroll down and click on Add individual feedback to give your feedback.
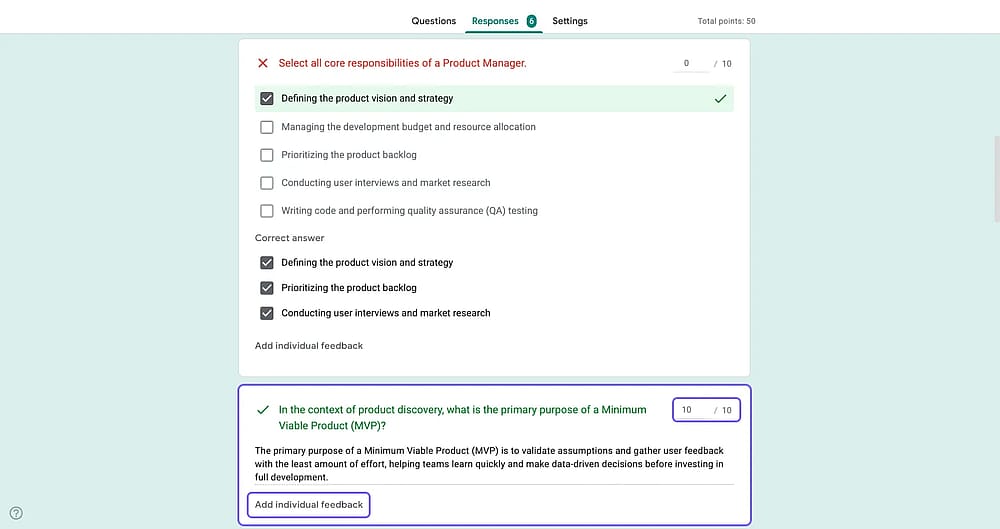
Reviewing questions that require manual grading
8. Release the grades and notify quiz takers
Once you are done with manual grading or just reviewing the scores, you can send your students their grades and feedback by clicking on the "Release score” button at the top of a response. Once you click, you’ll see settings to add or remove emails from the list and notify people about their grades.
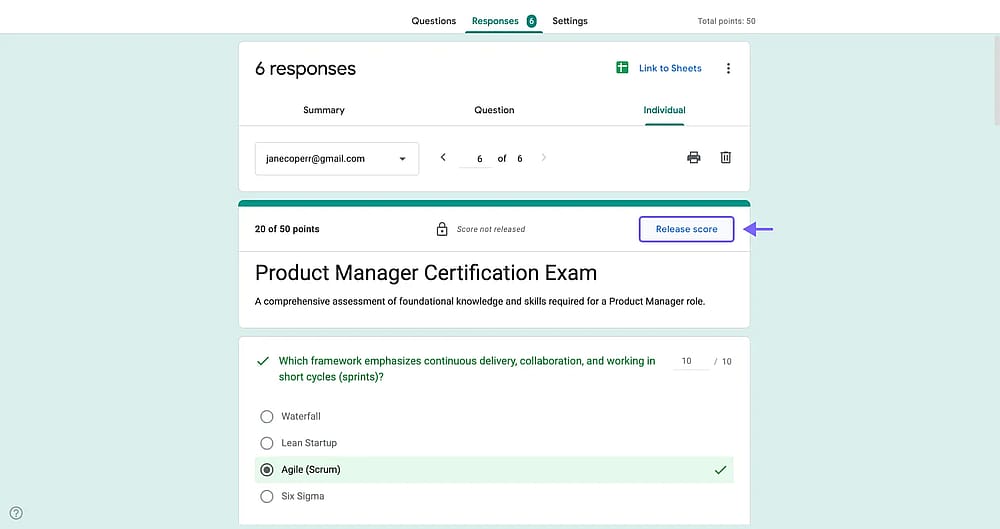
Releasing the grades
That’s it. You can now easily grade Google Forms and use it for your exams, tests, or assessments.
Tips for grading Google Forms
- Weight your questions by difficulty: Remember how you can assign points to questions? Simply give harder or more important questions more weight. This gives you a more accurate picture of what students actually understand.
- Add feedback on incorrect answers: Link to the relevant section of your material or write a short explanation.
- Use "Later, after manual review" for formal tests: When grades are released immediately, students can share answers with classmates who haven't taken the quiz yet. Holding grades until you're ready to release them removes that incentive.
- Be careful with short-answer auto-grading. If a question has more than one reasonable correct phrasing, add all accepted variants in the answer key. For anything open-ended, stick to multiple choice or plan for manual grading.
- Shuffle question order: Under Settings → Presentation, you can shuffle the order of questions for each respondent. This doesn’t fully prevent cheating but makes it harder, and gives each question a fair chance.
Common issues with Google Forms grading and how to fix them
Some problems are quite common with grading a Google Form. We have charted them out alongside how to fix these problems.
Problem | Likely Cause | Fix |
|---|---|---|
Short-answer question not auto-grading correctly | Student's response doesn't exactly match the key | Add additional accepted answers in the Answer key (click "Add a correct answer") |
Score not showing after submission | "See point values" or score visibility is turned off | Enable it in Settings → Respondent settings |
"Release score" button is missing | Form isn't set to "Later, after manual review" | Check Settings → Release grades |
Google Sheets not updating with new responses | The sheet was manually disconnected from the form | Re-link by going to Responses → Google Sheets icon and selecting the existing sheet |
Limitations of creating an auto-graded Google Forms
Google Forms handles basic grading well, but there are real gaps worth knowing about before you commit to it for anything beyond simple quizzes.
- No partial credit for checkbox questions. If a question has three correct answers and a student selects two of them, Google Forms marks it as zero.
- No built-in time limits. Google Forms has no native timer. If you need timed assessments, you'd need a third-party add-on.
- Essay questions always require manual grading. There's no AI-assisted scoring or rubric support for long-form answers.
- No personalized score reports. A response PDF looks basic and not customizable. It is also often not suitable for prints, as questions appear as they do on screen.
- Limited quiz analytics. The built-in charts are basic. There's no drop-off analysis or partial answers.
- Branding is fixed. You can change the header color and image, but you can't remove Google branding, add your own logo prominently, or match your school or company's visual identity in a meaningful way.
forms.app: A better Google Forms alternative for auto-graded quizzes
If you would like to create the best online quiz or exam experience for your students, increase the conversion rates, try using forms.app. With the help of several advanced features within forms.app, creating online quizzes and grading your students’ responses is the easiest it has ever been. Here’s a few of them:
- Partial weighted scoring
- Multiple endings based on score
- Custom PDF generation from responses
- One-question-at-a-time view
- AI quiz generator
- Free quiz templates
- Conditional logic
How to create an auto-graded quizzes on forms.app
Creating a quiz with auto-scoring is easy thanks to forms.app’s drag-and-drop interface and calculator feature. Here are the steps:
1. Create your quiz using templates or AI
To start creating your quiz, simply select a blank form, choose between our numerous quiz templates, or use forms.app AI.
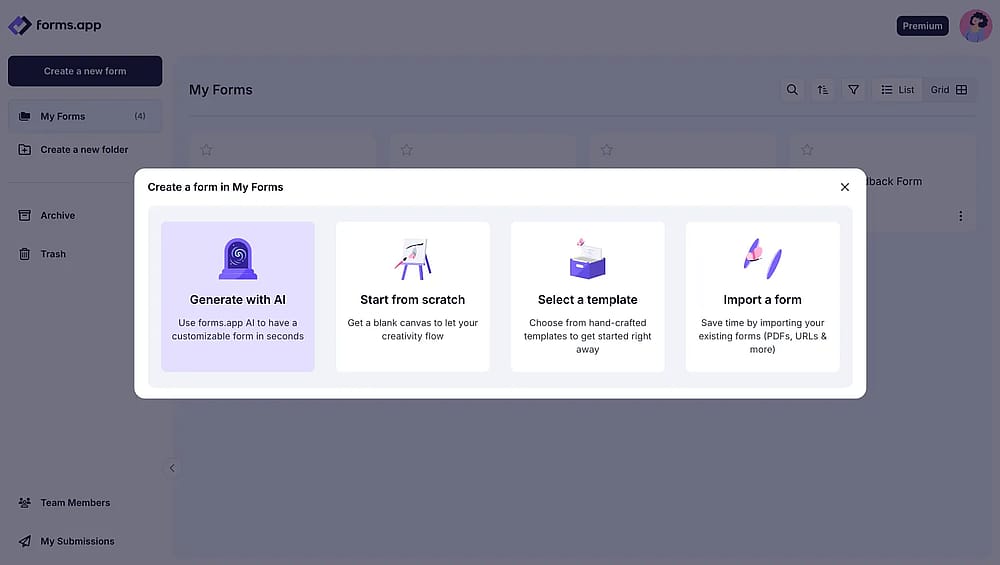
Form creation options on forms.app
2. Add questions using 30+ form fields
Once you created your quiz, add your questions from the Fields tab within the Build section, and customize the visuals of your quiz by heading to the Design tab.
We recommend experimenting with different dedicated question options within the Fields tab. These questions, such as a dropdown question that opens up a drop-down menu or a picture selection question, may add diversity to your quiz and keep your students engaged with the topic.
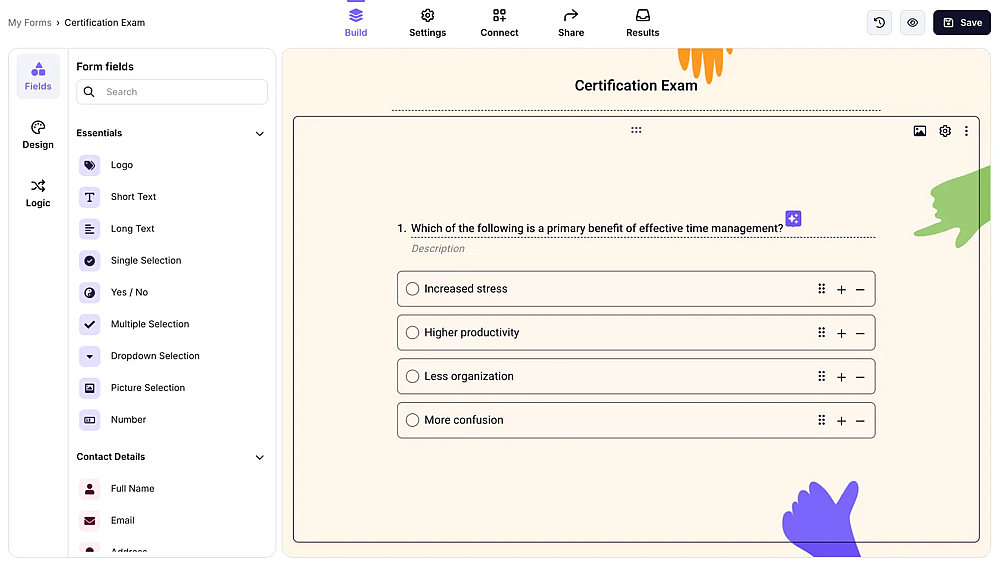
Drag and drop interface of forms.app
3. Use the Calculator feature
After completing the creation process, you must head to the Logic tab to make your form into a quiz. Within the Logic tab, head to the Calculator feature. The Calculator feature allows you to assign points to each answer option in every question. Therefore, you can choose to have more than one correct answer for a question.
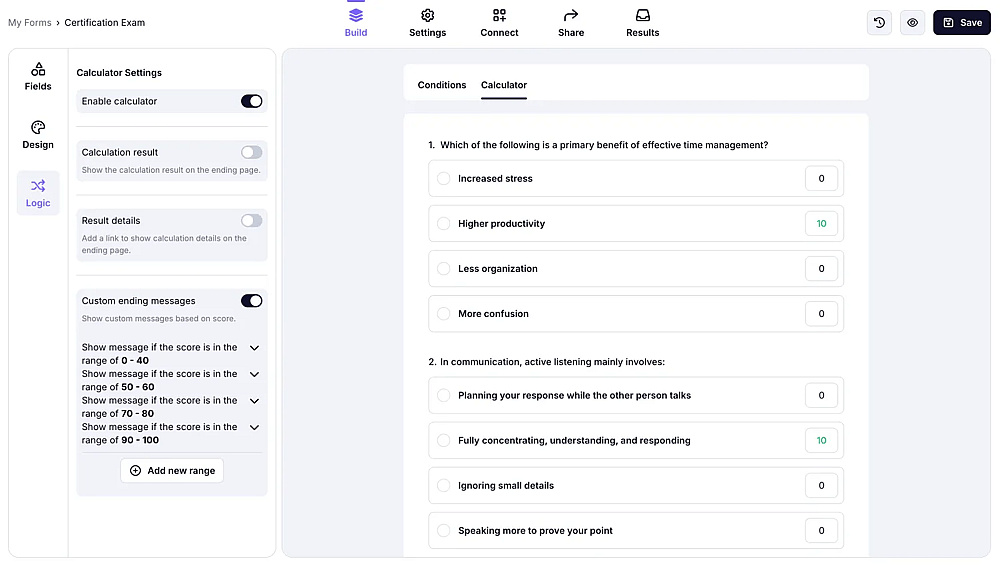
The calculator feature of forms.app
4. Share your form
Once finished, simply share your form by heading to the Share section and collecting responses. However, the Share tab is not just for sharing your quiz. You can also use the social media shortcuts to share your quiz on social media platforms, such as your class’ WhatsApp group, or change the sharing settings. Or you can choose one of the embedding options to display your quiz on a website.
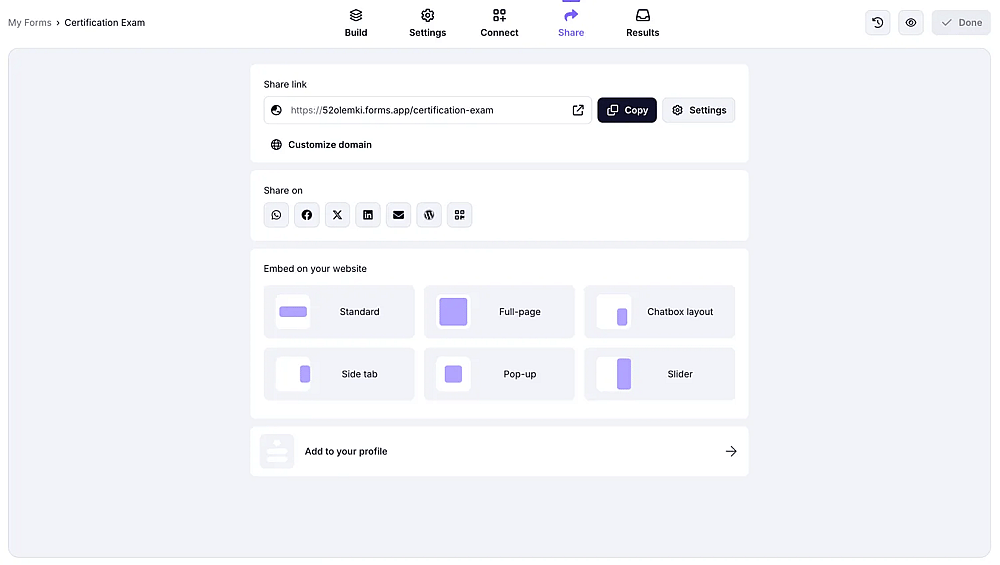
The share page of forms.app
5. Collect & review responses
After you have started collecting responses, we recommend visiting the Connect section to connect your quiz data to a workflow for better management and storage. Additionally, you can head to the Results section to look at the statistics of your quiz and analyze your student’s performance. The Results tab lets you see many details, such as the number of responses, the average submission time, and more.

The statistics page of a form on forms.app
Frequently asked questions about grading Google Forms
Since you understand how to grade your quizzes using both Google Forms and forms.app, it is time to get into the details of some frequently asked questions about grading Google Forms. These questions may allow you to understand any details or important points you missed.
The way to grade long answers on Google Forms is the same as for any other question. If the question has a definitive answer, you can assign a set point. If not, simply follow the steps above to assign point values to questions manually.
To learn how to turn on grade importing in Google Forms, simply go to Google Classroom, click on your class, head to Classwork, then click on the quiz assignment and go to View assignment. Once you are on the Student Work page, click on Import Grades, then click on Import. Make sure to turn on the grade importing option in Google Classroom.
Technically, you can export responses to Google Sheets and use formulas to calculate scores manually. But enabling quiz mode is the right approach as it gives you answer keys, point values, automatic scoring, and the ability to release grades via email, none of which you get otherwise.
Fortunately, Google Forms can do scoring. By turning your form into a quiz and assigning each question a point value by following the steps that we have provided above, you can allow Google Forms to handle the scoring process on your quizzes.
In Settings → Respondent settings, turn off "See correct answers." You can leave it off permanently, or enable it after everyone has submitted. You can also control whether they see missed questions and point values separately.
Key points to take away
In summary, using a tool such as Google Forms to create and grade your students’ exams and quizzes is crucial if you want to decrease your workload as a teacher. Furthermore, it allows you to experiment with different question types to keep your students engaged with your class.
In this article, we have looked at how you can use Google Forms to grade quizzes and exams, a better and more accessible way to both create and grade quizzes with the advanced features of forms.app, and several frequently asked questions. Use these steps to create a great online quiz experience for your students and decrease your workload!
Contributors
Researched & written by
forms.app, your free form builder
- Unlimited responses
- Unlimited questions
- Unlimited team members
Related articles