How to set a submission limit
forms.app offers awesome plans with the highest quotas. What’s more, you will be able to change your quota settings for utilizing them in the best ways possible. Let’s take a look at these settings and save a considerable space for the next respondents. 👩🏽🤝🧑🏼👩🏾🤝🧑🏽
Enabling submission limit
Whether using a free plan or choosing other pricing options, you can set a certain limit on form responses. Doing so will help you manage your forms better and get prepared for potential response numbers. Without any delay, let's start with adding a quota for form submissions:
1. Find the Quota section by first accessing the Settings tab and going to the Access area:

An image showing how to access the Quota settings through the Settings tab of your form
2. Once you enable the Set submission limit toggle, simply insert the maximum number of answers you would like to get:
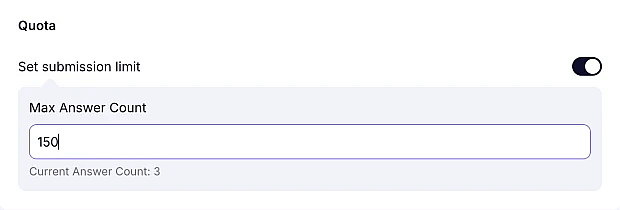
An image showing entering the number of submissions you would like to get to the Max Answer Count area
Don’t forget to press the Save button! That’s it, you’ve just set your form submission limit. Once the limit is reached, users will no longer be able to submit the form. If you also want to learn how to set your form as published or unpublished to inform your users and redirect them, check out this article.
Users who access your form after the response limit has been reached will see a warning in the upper corner stating "Records limit exceeded", and they won’t be able to complete or submit the form.
Yes, you can edit the message of this warning by accessing the Settings section and opening the System messages tab. To learn more, please visit our help page on System Messages.
You can set a response quota even if your form already has submissions. Just check the current response count displayed below the “Max Answer Count” area, and set your limit accordingly.