Online forms are a fantastic way to collect information, and they are the go-to method for many companies to interact with their customers and audiences. Furthermore, many companies look to improve their creation process by searching for ways to find new question types, collect necessary information such as email addresses, add questions of various kinds, and add new features to their forms.
A great way to increase attraction and engagement with your forms is to allow respondents to upload a file on your form. In this article, we will discuss what the upload a file button is in Google Forms, when to use it, a Google Forms tutorial for adding the upload file button, how to upload a file on forms.app, and frequently asked questions about Google Forms file upload button.
What is the upload a file button in Google Forms?
The upload a file button, also known as the file upload question, is a feature in Google Forms that allows participants of that form to access a file upload field.
This field enables participants to upload specific files needed by the organization or business and is considered a necessary part of certain forms.
The feature uploads the files to the form owner’s Google Drive, and respondents must sign into their Google accounts when file upload questions are added to a form. The creator of the form can also allow participants to upload only specific file types and customize the maximum file size.
When to use the Upload a file button
Deciding when to use the file upload feature is pretty straightforward. Specific organizations use specific types of forms that require participants to upload files. These files are almost always crucial for both the participant and the business to move forward smoothly. You can expect to use the upload a file button if you are:
⏰A business that does a lot of recruiting and collects a lot of CVs.
⏰A photo or video editing company that has a large clientele.
⏰A teacher who has to collect files from students to review and grade them.
⏰An organization that holds various competitions where participants must upload their work to your database.
⏰An organization or a school that selects applicants for a loan or a scholarship that requires legal documents.
⏰A company or a worker taking over work from somebody else or another organization to complete their work for them.
How to add the upload file button to Google Forms
The process of how to enable the file upload in Google Forms is a short process that requires little effort. The first thing that you have to do is open up a form using Google Forms. You can do this by opening a blank form or using a template.
After you open up your file, you will have to add a question using the plus sign within a circle at the top right side of the questions. After you add your question, you must click on the question to see the detailed settings of it.
💡You do not necessarily have to add a question; you can customize one by clicking on it and changing the question type.
Once you look at the detailed settings of the question, click on the part that reads Multiple choice to open up a dropdown menu. From there, you must select the File upload option to turn your question into a file upload section. You will see a disclaimer that informs you about the details of the feature, and after you click Continue, you can access the settings of the file upload question.
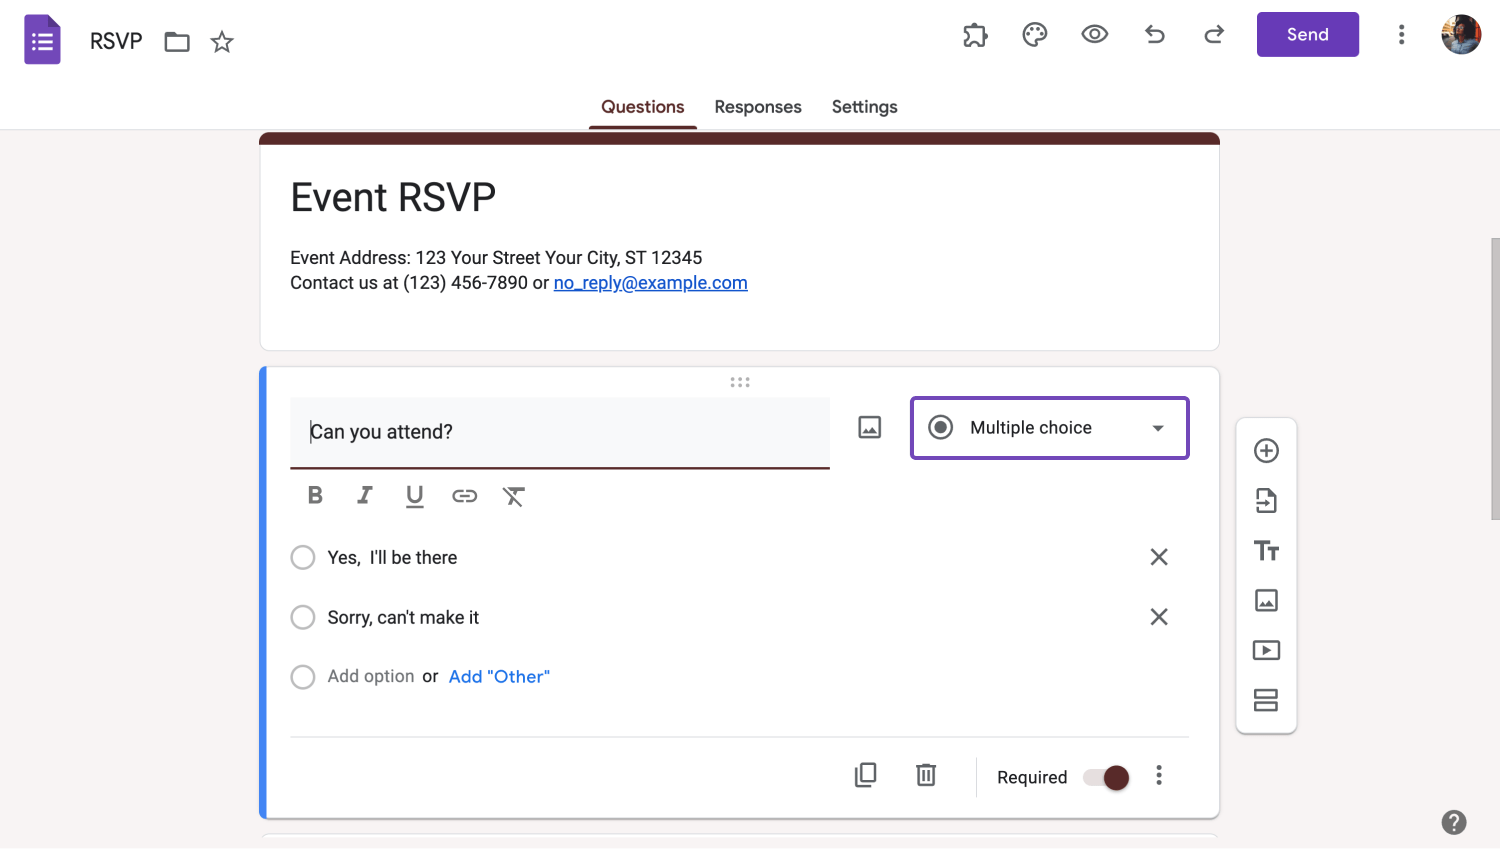
Click the Multiple choice
After you add your file upload section, you can change many settings, such as the number of files that can be uploaded, allowing only specific types of files, changing the maximum file size of the question and the form itself, and changing the Google Drive folder to which the file will be uploaded.
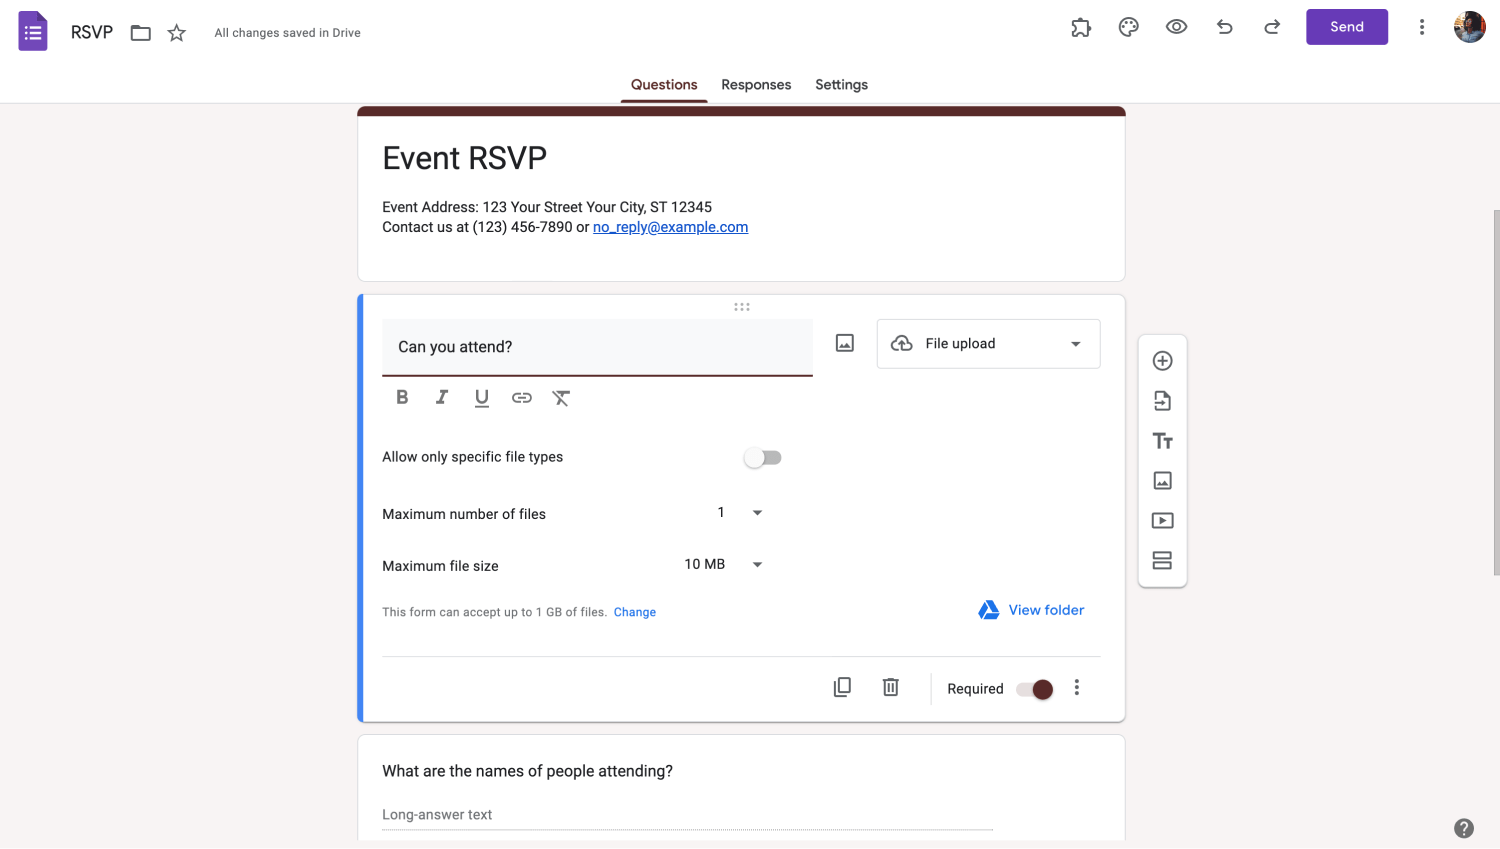
Customize the Google form settings
How do you upload a file on forms.app?
forms.app is a great form builder alternative because adding an upload file section is more straightforward than other form builders. You do not have to change any settings, click anything, or even look at any disclaimers. Here is the step-by-step process for adding an upload file section on forms.app.
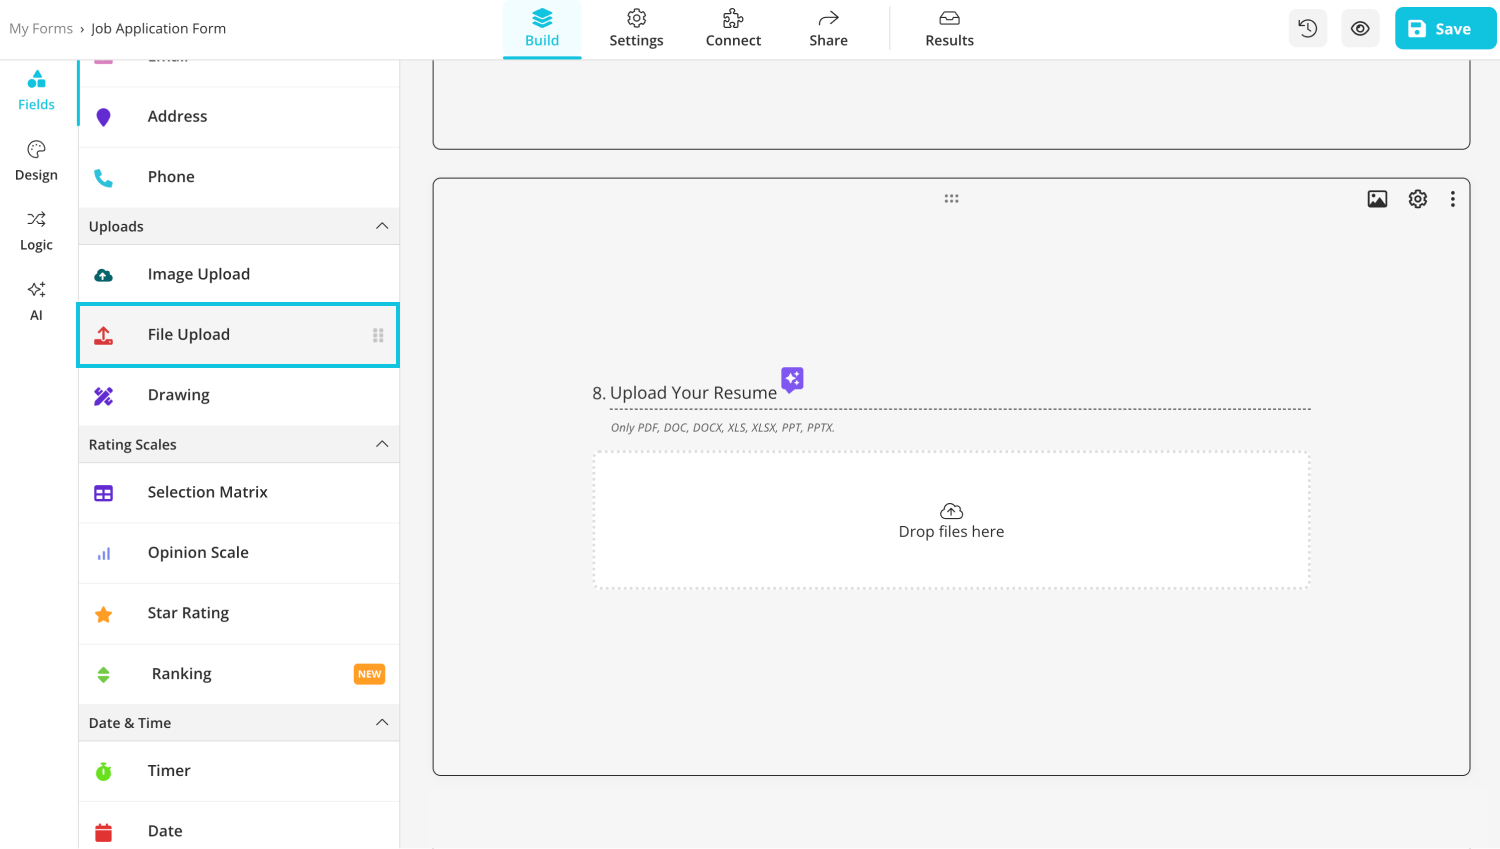
Add a file upload section
Simply create a new form using a blank form, a template, or with the help of forms.app AI. Afterward, scroll down the Fields section until you see the Uploads part. You can drag and drop any section you want from the uploads part.
💡The best part is that forms.app does not offer just a file upload section. You can have an image upload section or even a drawing section for your form.
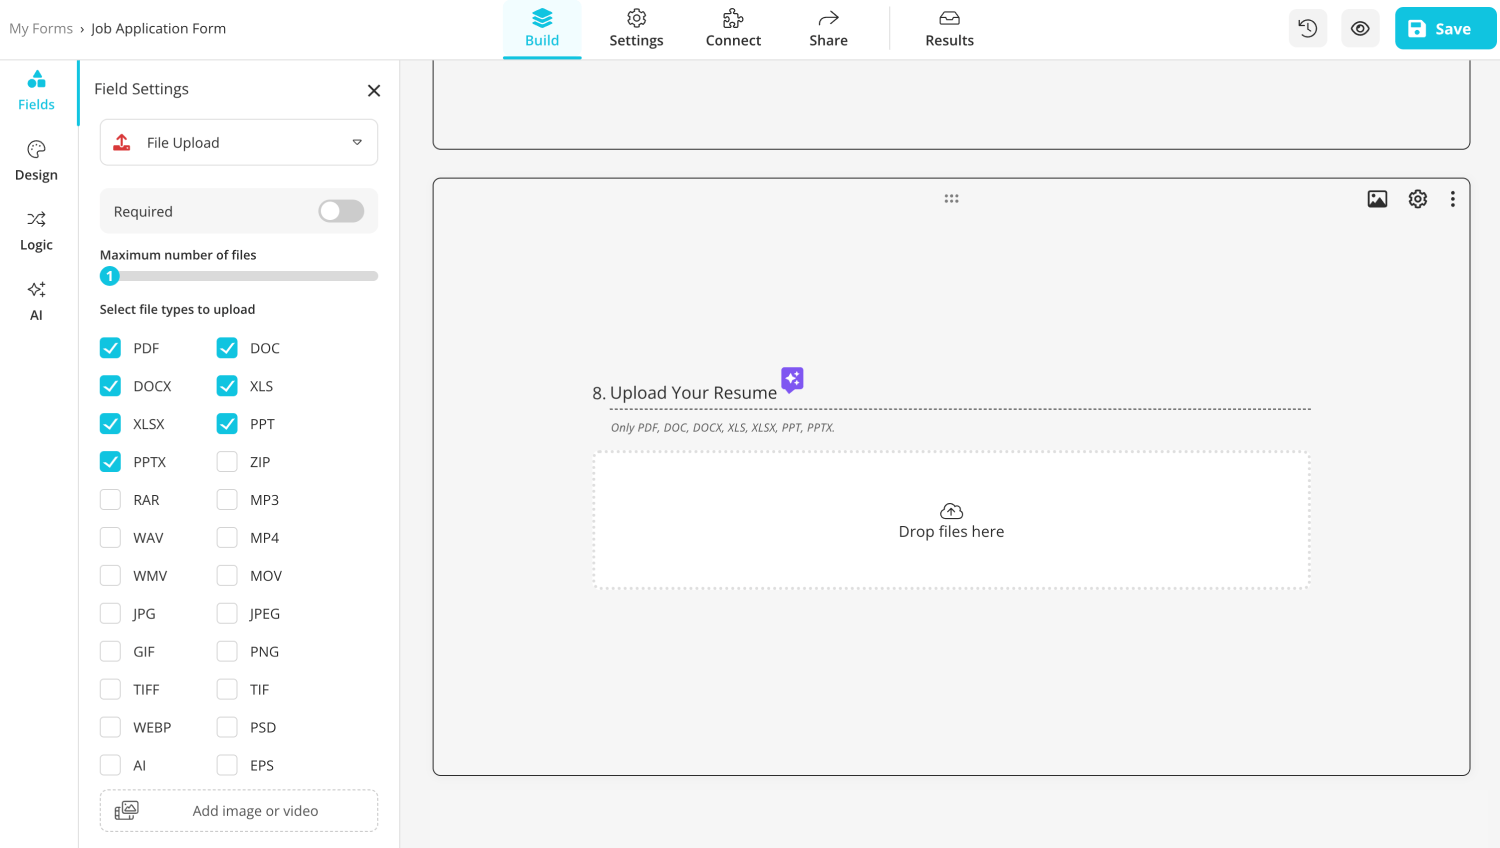
Customize the settings
If you want to change the settings of a specific upload section, simply click on the section itself and then click on the settings icon at the top right of the question. You can change how many files the section can hold to allow multiple files to be uploaded, change the specific file types that can be uploaded, or change the maximum number of images that can be uploaded within the image upload section.
💡You can connect your form to databases other than Google Drive, such as Google Sheets or Google Analytics, by going to the Connect section within the form builder.
Frequently asked questions about upload a file button
Now that you have learned how to create a file upload section using Google Forms, it is time to answer frequently asked questions about uploading a file to Google Forms and the upload a file button. These questions offer great detail regarding specific scenarios and are great tips for running things smoothly.
You can import a document into Google Forms if the form has an upload file section. If the form allows it, you can click “Add file” within the upload a file question and then upload the necessary files. However, you can only add files within the form owner's boundaries.
No, non-Google users cannot upload files using Google Forms. To upload a file to a form created using Google Forms, you must have an active Google account because the form will require you to log into that account before uploading a file.
Yes, you can upload a file to a form created using Google Forms if the form allows you to do so. To see if the form allows you to upload a file, look for an “Upload a file” section within the questions themselves. If there is a question like that, you can upload your file.
There are several reasons why you may not be able to upload documents to a form created using Google Forms. First, the form itself may not have an upload section, so there is nothing you can do. Secondly, the form owner may have changed the settings to allow specific types of files, and your file may not meet the criteria.
The third reason is the number of files you want to upload. If the form owner has changed the settings, you can only upload a specific number of files. The last reason is the file size. If the form owner has customized the file size that can be uploaded to a form, the file you want to upload cannot exceed that limit.
Final words
In summary, having an upload file section, also known as a file upload question, is an excellent addition to collecting detailed information. It is beneficial in situations such as job applications, collecting papers or homework for teachers, or collecting legal documents. Furthermore, you can customize the upload section to your liking to personalize the experience further.
In this article, we have discussed what the upload a file button is, when to use the file upload section, how to add the upload a file section on Google Forms, showed you a better alternative for collecting files with forms.app, and answered frequently asked questions about the upload a file section. It is now up to you to test both form builders and see the difference for yourself.
Yakup is a content writer at forms.app. He is also a skilled translator. His hobbies include reading, learning about different languages, and different branches of sports. Yakup's expertise lies in translation, NoCode tools, and Google Forms.
